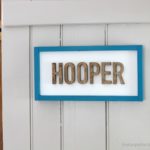
Scrolling on the scroll saw is truly addicting, if you haven’t tried it yet I highly suggest it. Because I can’t stop myself I made these pretty scroll saw name plaques as a gift for a friend with a new baby girl. One for the new baby and one for the older sister to coordinate.

Make beautiful, personalized name plaques using the scroll saw. Sharing how I created scroll saw name plaques for two sisters.

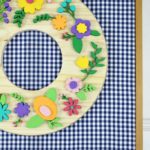
The best part about this kind of scroll saw wall art is the dimension. I love how the pieces pop off the background like they are coming to life. To make this happen use different material thicknesses, the thicker the material the more it will pop.

I used mostly 1/2″ MDF for all the cut out pieces and then layered up 1/4″ MDF where you see additional laters. In addition to the three dimensional effect is the color contrast between the white background and floral designs.
Be sure to follow me on Instagram where I share sneak peeks into projects I’m working on in Insta-stories.
Supplies:
- MDF (1/2″ and 1/4″ thicknesses)
- flower print outs (use free clip art and scale to size in a word doc)
- spray adhesive
- scroll saw
- acrylic paints and paintbrush
- DAP rapidfuse glue
- backing (3/4″ plywood)
- 1/4″ thick flat moulding (trim)

To start this project cut out a bunch of floral shapes. Use free clip art patterns to help you create consistent shapes. I use spray adhesive to attach the printed pattern onto the MDF.

For this project I used a Ryobi scroll saw, it’s a great saw for beginners. To see my current scroll saw set up click here.

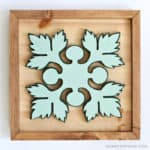
Once you have a bunch of pieces painted start laying out your design on a board.

To secure the shapes to the board use Rapidfuse or super glue.

Where pieces are layered I use glue and pin nails since the nail head will be hidden by the next layer.

I tried hard to narrow my color selection but it’s difficult with so many beautiful colors to choose from! I used all DecoArt Americana acrylic paints on the florals and lettering for this project. It’s a matte finish that goes on super smooth and opaque with two coats directly onto the MDF. A little sanding between coats and you have a super smooth finish.


Trim out the backing board using 1/4″ flat moulding which I stained. Then add a sawtooth hanger at top center.

Hope you enjoyed this project as much as I enjoyed making the name plaques. It’s really so much fun creating something from nothing!

SHOP THIS PROJECT:


These are beautiful. I don’t think I have the skill set for these!
Thank you and yes you can do it! Start with something simple and you’ll get there fancy real quick.
This is so cute! Where did you buy the mdf? Also, what kind of backing board did you use? I would love to make one of these for a baby shower next month!
Thanks Mary, I buy MDF handy panels (2′ x 4′) at Home Depot because it’s more manageable. The backing board for these pieces is 3/4″ plywood only because that’s what I had lying around. Good luck with your baby shower gift, momma will appreciate that’s for sure!
Hi Jaime! I love these so much! What is the measurement of the back board? And what color stain did you use for the frame? Do you just use brad nails to attach the frame to the board?
Hi Kim, Thanks for your nice comments. If I remember correctly the backers are 14″ x 14″. The stain is probably Minwax early American and I used pin nails and wood glue to attach the frame pieces to the backer.