* This post is sponsored by DecoArt.
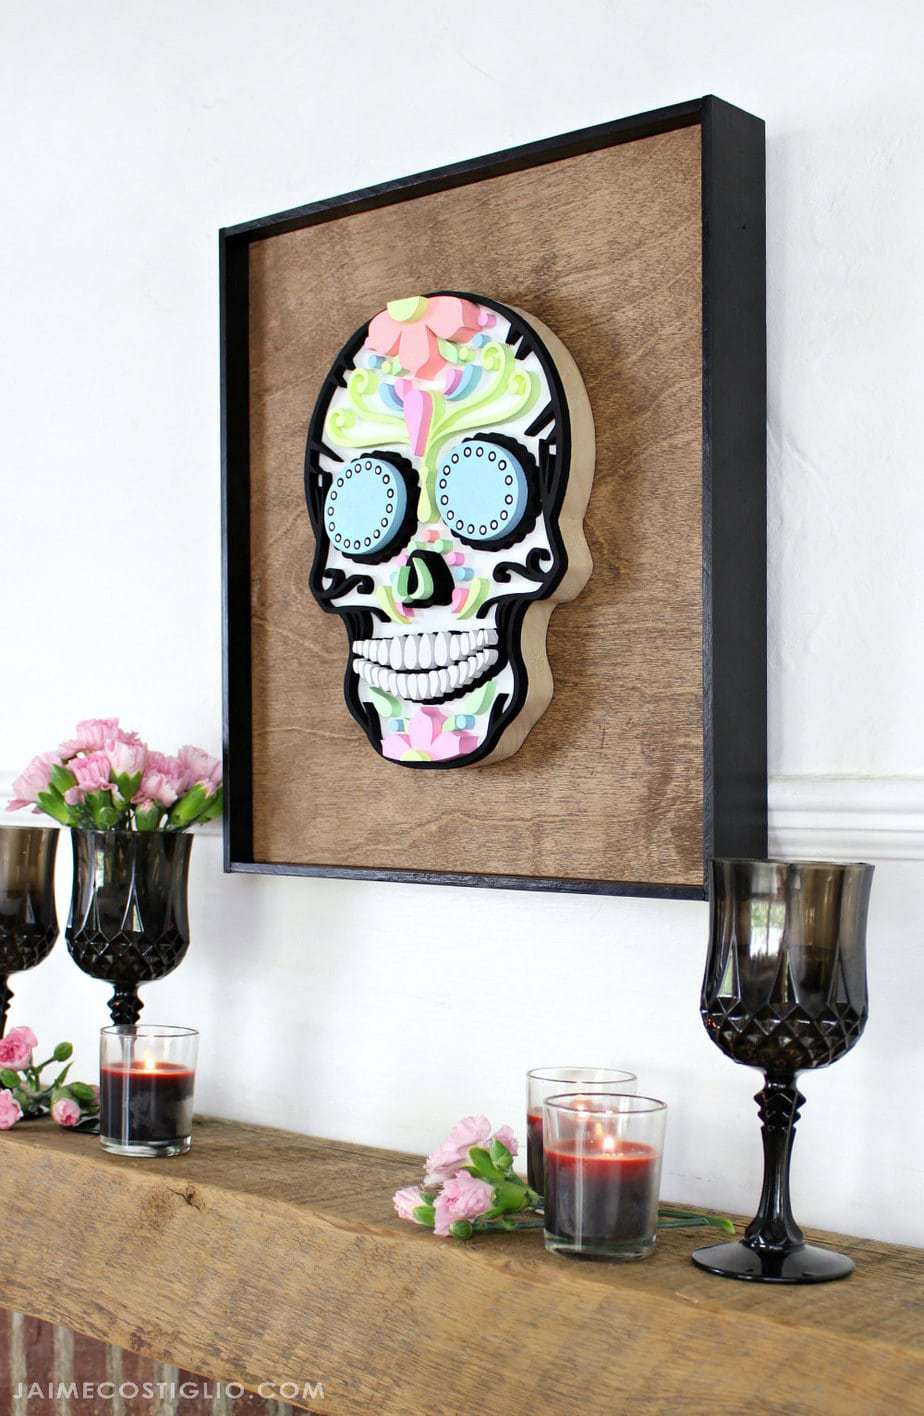
Looking for an alternative to the typical orange Halloween decor? Let’s try a softer shade that’s fun and fresh, we’re celebrating Pasteloween with my not so scary pastel sugar skull.

A DIY tutorial to make a Pasteloween sugar skull painted with DecoArt neon lights acrylic paint. Halloween doesn’t have to be orange, let’s celebrate with pastel colors.
I love the intricate designs found on sugar skull art so I took a flat design and made it 3-dimensional using my scroll saw. Then made those dimensions really pop and come alive with pastel paint colors.


Painting all the pieces just might be my most favorite part second to cutting them out on the scroll saw. You could apply this same concept to a flat precut wood skull shape available at craft stores. Grab the DecoArt Americana pastel neon light colors made with bright, concentrated pastel neon colors and paint all the design bits in different pastel shades.
In case you didn’t already know DecoArt Americana acrylic paints are my go to for all painted craft projects and lately that’s been lots of scroll saw art. Their acrylic paint is bright and contains lightfast pigments that provide one coat coverage with most colors. It goes on super smooth, blends easily and has a durable matte finish. Plus it’s made in the USA!

One super fun bit about the DecoArt neon lights paint is that they are fluorescent acrylic paints which means they glow under a blacklight!

Down below I’m sharing the tutorial to make this Pasteloween sugar skull wall art. I hope you are inspired and make your own pasteloween wall art for this Halloween season.
Supplies:
- printed sugar skull design
- 1/4″ mdf
- scroll saw
- spray adhesive
- paint brushes
- DecoArt Americana white acrylic paint
- DecoArt Americana white acrylic paint
- DecoArt Americana neon lights paint: pink explosion, peach punch, radiant yellow, green energy, knockout blue
- sandpaper
- rapidfuse super glue
- pneumatic nail gun & nails
- plywood backing
- flat mouling
- wood glue
- wood stain

Step 1: Print out your desired sugar skull design. I used free clip art, search google for tons of graphics. Be certain you are using a royalty free design. I used 1/4″ mdf for most pieces on this scroll project. Apply spray adhesive to back of printout then press onto MDF and cut out all pieces.

Step 2: Once all pieces are cut use sandpaper to smooth any rough edges. The large backing piece was cut from 3/4″ plywood.

Step 3: My secret to keeping all the little teeth organized is by numbering each tooth on the back which corresponds to a number on the printout.

Step 4: Begin painting the pieces. Decide which parts will be black and paint all those pieces at once using DecoArt Americana acrylic paint. Then paint all the pastel pieces.

Step 5: Cut and stain a piece of plywood for the backing. Attach the skull to the backing using rapidfuse super glue and 1 1/4″ finish nails. Place the nails where you know they will be covered by a piece on top. Then attach the remaining pieces using rapidfuse and following the design.

Step 6: Add extra details like dots using the end of the paintbrush dipped into paint.
Step 7: Make a simple frame from flat moulding painted black then glue and nail onto the sides of the plywood backing. Hang and enjoy!


I am completely and utterly gobsmacked!! You truly are the Queen of the scroll saw! Absolutely stunning!
Thank you Shelly, you’re too kind! I do love to scroll (and probably spend too much time at it) but it’s so fun. The freedom to make and create whatever you want is one of the best aspects, you’re not confined to dimensional lumber or joints and hardware. Now if only there were more hours in the day for scrolling!