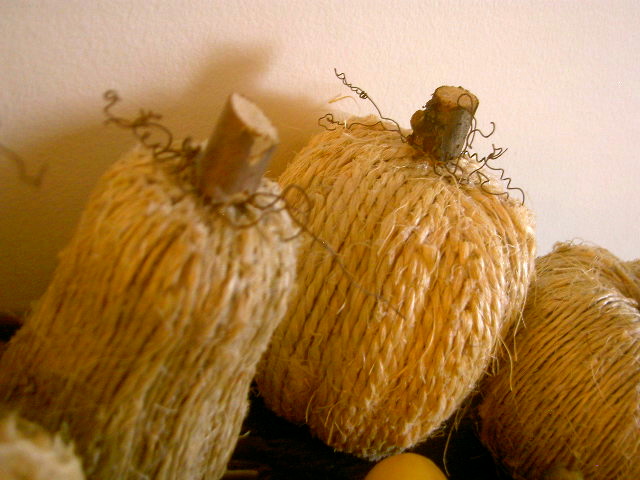
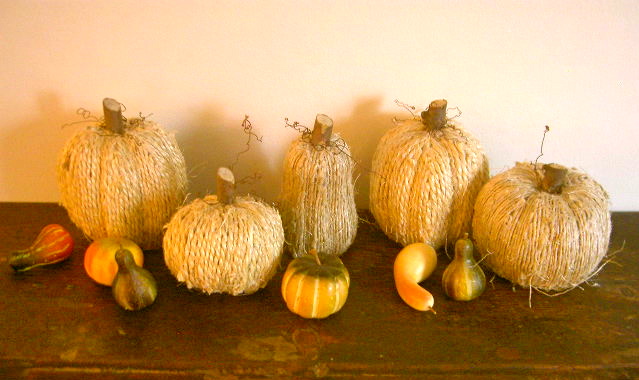
Jute wrapped pumpkins for Fall.

While Hurricane Irene was blowing outside I fired up the glue gun for some Fall crafts,
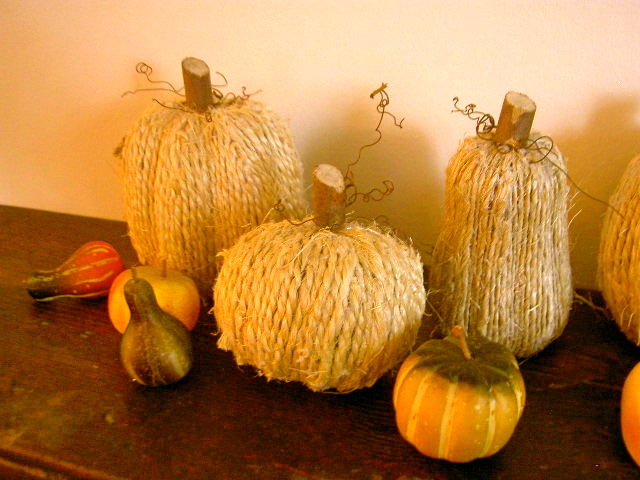
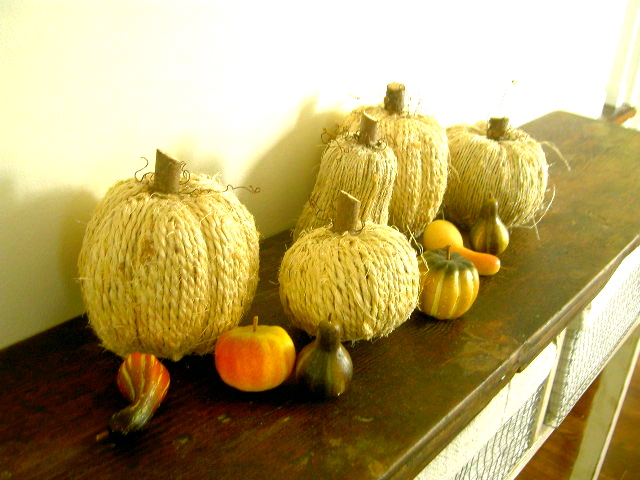
wrapping up all my styrofoam pumpkins and gourds with jute and twine.

Eventually these will make it to the mantel for Fall.
Here’s how I made the pumpkins:
1. Gather your old styrofoam pumpkins and gourds, twine, and hot glue gun:
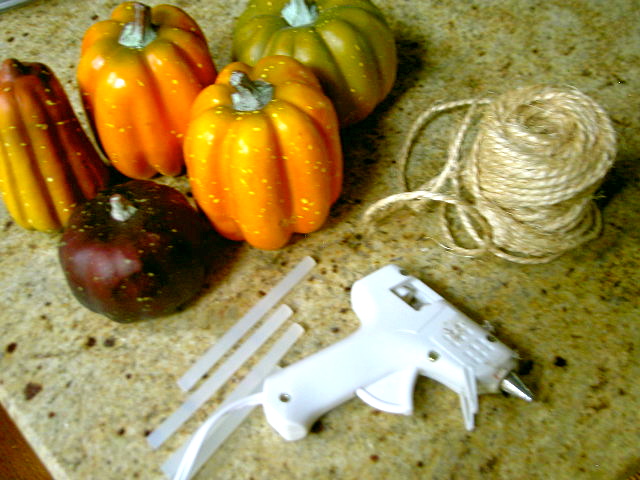
2. Pull out the plastic stems and discard.

3. Start wrapping the pumpkins either at the base or top using hot glue:
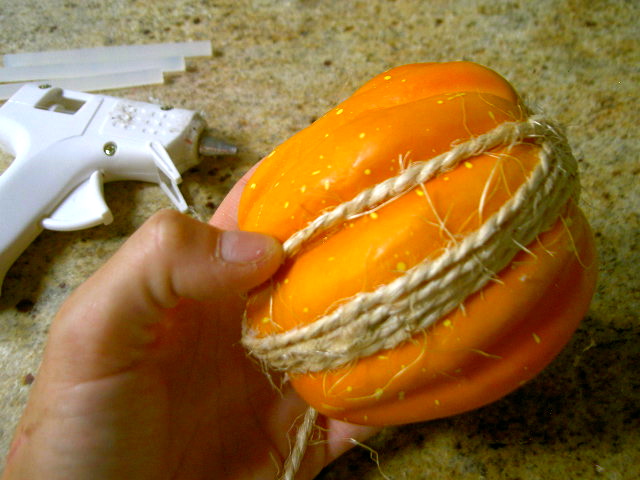
4. Keep wrapping and gluing, no worries about those ‘hot glue strings’ hanging as they only enhance the nature of the twine.

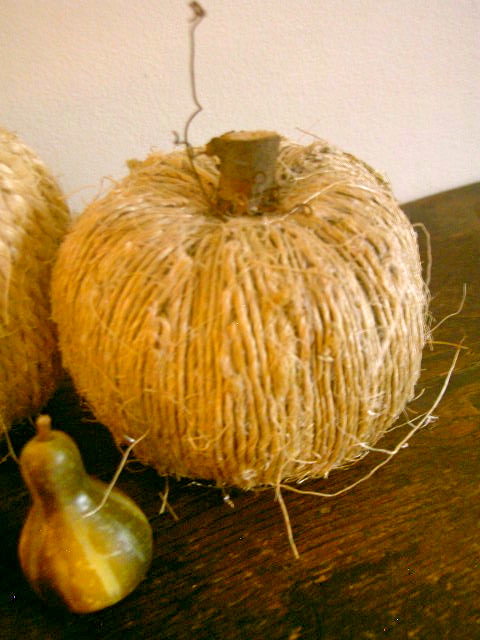
5. For the stems find a stick and slice short stems with an angled top:

6. Hot glue the stem into place with some woody curly bits:

7. I also used thinner jute on a few for contrast:
Easy project using supplies I already had on hand to update my Fall decor.

I’m linking up to:
Whatcha Got Weekend @ Lolly Jane
SAS @ Funky Junk
Weekend Wrap Up @ Tatertots & Jello
Sundae Scoop @ I Heart Naptime
Sister Sunday @ Sisters of the Wild West
Sunday Showcase Party @ Under the Table & Dreaming
Just Something I Whipped Up @ The Girl Creative
DIY Fall Festival @ The DIY Showoff
Made by You Mondays @ Skip to My Lou
Making the World Cuter @ Making the World Cuter
Nifty Thrifty @ Coastal Charm
Tuesday Treasures @ My Uncommon Slice of Suburbia
Tutorials & Tips Tuesday @ Home Stories A to Z
Good Life @ A Beach Cottage
Delightfully Inspiring @ Delightful Order
Transformation Thursday @ The Shabby Creek Cottage
Strut Your Stuff @ Somewhat Simple
Share Awesomeness Thur @ The 36th Avenue
Flaunt it Friday @ Chic on a Shoestring
Tickled Pink @ 504 Main
Frugal Friday @ The Shabby Nest
SAS @ Just a Girl
Feathered Nest @ French Country Cottage
Remodelaholics Anonymous @ Remodelaholic
Cottage Flora Thursdays @ Fishtail Cottage
inspiration board @ Carolyns Homework
Weekly Challenge @ The CSI Project


Waaayyy tooo cute!!!
What a fabulous idea. These look soooooooo fantastic. Great tutorial also. Hugs, Marty
Your pumpkins look great! I've been wanting to do something different this year. I may give this a try.
so cute! love the rustic look!
Girl, you are talented! Look for it Friday on my site!
Jen
These pumpkins really look great! Good tutorial! Thank you for sharing this idea!
So long – Dania
Super cute!!!
these are fantastic!! I can't wait for fall!!
I love the texture of these pumpkins! The jute looks so much better than the ol' styrofoam. I particularly am impressed that you were able to devise a way to keep the ridges and valleys of the pumpkin shape! Awesome!
Kristen
Turning a House into a Home
I love ideas like this! It's a great way to reuse what you already have, but make it look fresher. Very cool, Jaime!
I love these! I love how rustic jute is, and I love pumpkins. What a perfect combination.
Thanks for sharing. Pinning on pinterest. 🙂
Cheers,
Tracy Screaming Sardine
What a neat look, and a great tutorial. Love the texture.
Just adorable!!! Thanks for sharing. Visitng from Nifty Thrifty Tuesday. I am having a giveaway if you'd like to join!
Roselle
Oh I love this so much! Once I get my Fall stuff out I am going to try and do a few for a centerpiece! Just so creative. Thank you!
Wow, this looks fantastic and very creative. See you at My Dream Canvas.
LOVE these! Great idea and thanks for the tutorial:)
great idea! love that you're way ahead of me for fall. still thinking bare feet.
come visit anytime.
michele
So cute – love the rustic texture and the neutral colour.
This is a really terrific idea Jamie! You really put a lot of creativity into sitting out Irene!
Hope you will bring one of your projects to my first Potpourri Friday Party this week – Friday, September 2. Link-up starts on Thursday afternoon. Without a doubt, your participation will help make the party better!
Oh my, what a fun, cute idea! Thanks for sharing the tutorial.
Love these pumpkins, they are so cute! What a great idea.
Wonderful project. This gets me in the mood for fall! I would be so happy if you shared this project on my Inspiration Board {link party}. I know my readers would really enjoy it.
http://carolynshomework.blogspot.com/2011/08/inspiration-board-link-party-13.html
Hope to see you there.
carolyn | homework
I like these a lot! I need some for my mantel! I will be featuring these for Three Things Thursday tomorrow- hope you'll stop by, check it out, and grab a featured button if you like.
Valerie- http://www.occasionallycrafty.blogspot.com
Great idea!
Love it!
Gosh what a great idea! I'm going to save it and use it next year,as I finished putting out my fall decor today. Yes I know its a wee bit early, but I am trying to give the hot weather the heave ho!
I'm ready to make some fall pumpkins too. Summer is fading fast, so I'd better get busy! ::Jill
This is sooo cute!! My pumkin patch is looking sad after our cold summer, I have been tring to come up with an alternative plan! Thanks for the inspiration:-)
Bella
What darling pumkins! They look fantastic!
Hi , what a great idea! You just motivated me to get to the 'christmas tree' shop and get some inexpensive pumpkins to cover!Thanks for sharing 🙂 visiting from tipjunkie
These are so lovely! Great nod to oncoming autumn even though weather's not with us yet!
I'd love for you to link these up to my link party tomorrow at Rummage Living: T.G.I.F. (Thank God I'm Finished!)
Hope to see you there!
xo
Margaret
http://www.rummageliving.com
Excellent idea you clever woman! Now I have to find all my pumpkins in storage.
Thank you for such an inspiring idea! I love jute and I love pumpkins, but wasn't sure I wanted orange ones this year. I also did this idea on a lampshade and loved it!
Fabulous!, I'm crazy about these pumpkins you've created! Thank you for sharing the tutorial and just came to visit you from FNF, hope you come over too, I have a fall tablescape you might like! Hugs, FABBY
Great idea, Jaime! Love the texture of your pumpkins! I'm going to have to try this technique out before autumn arrives! 🙂
xoxo laurie
Love. Enough said.
What a great project! Those pumpkins are so facky looking and these are so pretty….love it!
Love the pumkins with all that texture just screams fall.
Those are just the cutest pumpkins! I love this idea as it is very soft and natural. Great job! Found you via Shabby Creek Cottage. Stop by anytime!
BTW- love your letter idea for your blog and posts.
What a great idea for those cheep little pumpkins!
These are so up my ally! Thanks for sharing.
So, so super creative! I love this idea! And how great do they all look together! I may have to do this myself! Thanks for inspiring me!
I'd love for you to link this up @ Show & Share–
http://southernlovely.blogspot.com/2011/08/show-share-3.html
I just adore your charming little jute pumpkins!! They are so sweet!! Sharing this on FB~ Thanks for sharing at Feathered Nest Friday!
These are super cute!
I'm loving this idea! Just the thing to freshen up those drab old pumpkins! Thanks for the inspiration.
Adorable! I have to try this!
Stacey of Embracing Change
Adorable ! just what I needed to see to get me into a crafty Fall state of mind..
Happy September.. hugs from Savannah, Cherry
Those are amazing! What a fabulous idea!
Trish @ Uncommon
Gorgeous, gorgeous, time to get my hot glue gun out:)
What a great idea! They look way better with the jute than they did before. Thanks for showing us how to do this! 🙂
What a great idea these are so fun! Just pinned this!
I would love it if you come link this up at Scrappy Saturdays @ candacecreations.blogspot.com
That's a GREAT idea to give new life to some tired old pumpkins!! And I love how you said, with Irene blowing outside – you fired up the glue gun inside 🙂
Pinning you now onto my Autumn pinboard!
xo Lynda
very nice! I'm getting started right now on my old pumpkin makeovers!!! Thanks!
Love this and looks easy to do! I just have to try this, I have alot of the old orange pumkins. Thanks for sharing!
Rondell
What a super, super cute idea! Love it and just might have to borrow this!
going through our link party linkups, i was drawn to this. when i saw it was yours i was like "yep! that would be hers, so cute!" (:
Your project is very inspiring! I really like the texture created by the jute. Thanks for sharing!
These look fantastic! Great tutorial too. I'd love for you to link up at my Fall Craft Challenge, going on now!
http://oneartmama.blogspot.com/2011/09/falling-for-crafts-challenge-1.html
I love the after- much better 😉 We featured this cute decor this weekend! Thanks for always linking up with us- we love to see your stuff Jaime! xoxo
Hi there! I visited this post last week and left a comment but I'm here again to let you know I'll be featuring this project on my blog in a fall roundup post. Stop by and check it out if you like. 🙂 Thanks again for the great project!
I left a comment earlier but I'm back to let you know that I featured them in my fall pumpkin round up. Thanks for the inspiration, I love them!
Love this idea! Thank you!
P.s. Where can I find styrofoam pumpkins?
how creative you couple are!! pumpkins cna be made into an artistic decor !very cute! there must be something you can design to decorate a marquee
OH!!! I LOVE these!!! I have some old dinged up pumpkins, this is on my "to do" list ASAP!!
Love this project too and also featured it in my roundup of jute craft projects here. Feel free to check it out if you want and hope you like it! : )
-Mel the Crafty Scientist