Well that title may be a little misleading as there are some limitations as to what types of wooden objects are suitable for personalization but for the most part nearly any flat wooden surface will work.

How to personalize nearly any wooden object so long as it has a flat surface for you to paint.
That’s probably a better description of this tutorial and way more accurate. So let’s get to it! If you haven’t already guessed it I love to paint by hand but I don’t actually freehand much especially lettering.

The secret is to use a computer generated print out. You can pick any font your like in almost any size. The larger printout will require some taping together but that’s fairly simple.

You can see I’m simply painting inside the lines to make the letters above. I work from right to left because I am left-handed and don’t want to smudge the fresh paint.
I originally shared how to handpaint letters onto wood in an older tutorial post here. This process below is a updated version with much better pictures and fun fresh paint colors too!
Supplies:
- wooden trug or other flat wood surface
- painters tape
- paint brushes
- computer print out
- ballpoint pen
- acrylic craft paint
- clear gloss poly spray
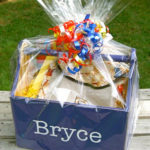
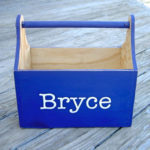
For this project I used my wooden trug painted in Glidden sunbaked orange. Choose a wood surface that’s flat and has enough space to fit your lettering.

Step 1: Mask off a 2 1/2″ wood band with painters tape.

Step 2: Paint inside the band, I used Behr lake blue.

Step 3: Line up the print out finding the center points and tape in place using scotch tape to prevent shifting. For this font I used American Typewriter in size 175.

Step 4: Using a ballpoint pen trace outline of lettering with heavy pressure. The pressure from the pen will create a slight indent in the wood.
Below you can see the indent left behind, you have successfully transferred the lettering onto the wood.


Step 5: Paint on and inside the indent.
Step 6: Once complete, seal with clear acrylic or poly spray gloss:

You can get a very professional look and finish for a fraction of the cost. And you get to choose the paint colors and font. That’s the beauty of DIY, you are in charge of all the variable options.
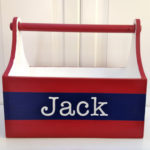
Now get all those toys and fill it up:

Or leave it empty:

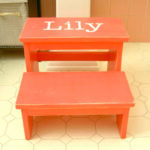
Either way it’s still pretty darn cute. This is a very simple project that can turn a blank, empty wooden object into a great gift.

A gift that’s personal and you made it! Looking for more gift ideas you can make?


Yes~that would be perfect for Easter! I might have to make one of those. Thanks, Jaime!
Wow! You have a nice steady hand…I just did something similar with numbers and had to fight the shakes. haha
I sent you an email a few days ago, about a project idea I have, I heard about your blog from Cassie through another blogger friend of mine. I know…it sounds confusing…but I'm thinking my email got stuck in your spam filter. I am working on a "pass it on" project and heard you just passed something along, so I wanted to invite you to participate in my version. If you don't have the email and want me to resend it please email me. Thanks!
Karah
thespacebetweenblog.wordpress.com
This is such a cute idea. I would love for you to stop by and link up at my linky party via: ourdelightfulhome.blogspot.com
Mrs. Delightful
Ourdelightfulhome.blogspot.com
Thanks so much for sharing with us how to transfer the font to the wood. Sometimes I avoid personalizing something because I ruin the look with my less than great free hand lettering. This will be perfect! I saw your post over at Carolyn's "Homework".
This is such a neat idea! Looks awesome! Dropping by from the DIY Show Off Party.
Very cute. I like the bold colors.
so super cute come see what yummy treat I shared on my blog at http://shopannies.blogspot.com
Love your tutorial! I can't wait to try it on something! (Like I need a new craft project!)
What a great box! Love the tutorial. Thanks so much for sharing.
Mandy
Thank you so much!
what type of brush and paint do you use for the letter. how do you keep your hands steady?
Thanks
Yes I would also like to know what type of paint brushes you use. I have used your ideas before, I have seen a few on pinterest I like to paint things such as this and have always wondered. I am trying to find some brushes (not too expensive though) 🙂 thanks
Fabulous directions. Just one suggestion. Wait as long as you can for the paint to cure before putting the sealer on to avoid bleeding and streaking. Try a week if you can.
Fabulous directions. Just one suggestion. Wait as long as you can for the paint to cure before putting the sealer on to avoid bleeding and streaking. Try a week if you can.
Thank you SO much!! Seems everyone is able to use vinyl these days and I don't have that option unless I buy it every time. Thank you for this simple and great alternative!!! SO excited to try this today!
Hi, Was wondering where did you find the American Typewriter font, and how did you get it to 175 pt. I've got it but cannot get it past 72. It could be my word program, but I didnt know if you downloaded it in a larger size.
I think if you just type in the number you want in the font size
Hi!
I just found your blog!
Am your newest follower….
What paint brush do you use for lettering?
You've got me stumbling around my house, wondering what to brand…..
Hi Jamie, I used your idea on my blog today… I gave you credit & linked it back to you 🙂
Carol
http://whitfieldshomeinthecountry.blogspot.com/2012/08/how-to-paint-letters-made-easy.html#
U can usually do larger fonts if you type in the number instead. Just highlight the 72 then type in the size you want and hit enter. Simple as pie. I find it to be slightly difficult to paint over indented lines and not make a mess. I put newspaper behind the printed design to transfer the image outline for light colored projects. And for darker ones like this I use white sewing tracing paper. No indents. Pretty much the same idea
I saw this on pintrest and have been wanting to try it for awhile. Getting started tonight! Making some road signs for my garden. Tonight I try The Shire. THANKS!!!! I'll link to you if it all turns out.
This tutorial was a great help for my sister-in-law's Christmas gift this year. I made a "birthdays" plaque to hang family birthdays from. It was perfect. She absolutely loved it! Thank you! I'm going to link back to your blog in my new post featuring the birthday calendar on The Versatile Momma. Thank you again!
You could also use "paint" markers to fill in the name. You can find a wide variety at Hobby Lobby.
You could also use "paint" markers to fill in the name. You can find a wide variety at Hobby Lobby.
Thanks for the tutorial! I found it on Pinterest and just tried it last night. I linked to you on my blog: http://www.rose-in-real-time.blogspot.com
cool idea….i will try it 🙂
http://daybydaycreation.blogspot.com/
Yay! You're left handed like me! Now I realize how much easier it is to paint from right to left 🙂
If you are trying to transfer the lettering to something that will not make an indent, color the back of your paper with a soft pencil or chalk (Chalk works good on black) and then trace over your letters. The chalk or pencil will leave some residue which will give you an outline. Your letters will probably not be as precise as these that have the paint dam, but they turn out better than just free-handing them. We recently used this method on making some personalized t-shirts.
Just found yiu via Pinterest! Great tutorial. I have to do a quote on a panel on an island (kitchen) that I stained for a client. If I make a mistake with the lettering (plus I am doing some stenciling and artwork) it will be difficult to repair so I think I have to have a sign maker create the quite fir me.
But for painted projects, thus is a great idea!
Thanks for posting…love yiur blog. I am on Long Islabd. I would love to see if I could get some local bloggers together to put our collective ideas and skills together to improve traffic to our blogs. Would you be interested?
Good to meet you.
Linda
http://www.thecolorfulbee.com
Brillant! Thanks for this, the best ideas are always simple!
That is SO cute, thank you for showing how to do it!! : )
Any tips for really large letters, ones that might not fit on one sheet of paper such as one for a cornhole game board?
sorry please link my comment to my email here.
Great tip! Such a simple way to add the outline of the letters. Thanks so much for sharing.
Loving the blue and orange together too
How are you printing out the names? do i need a special machine? I really need these