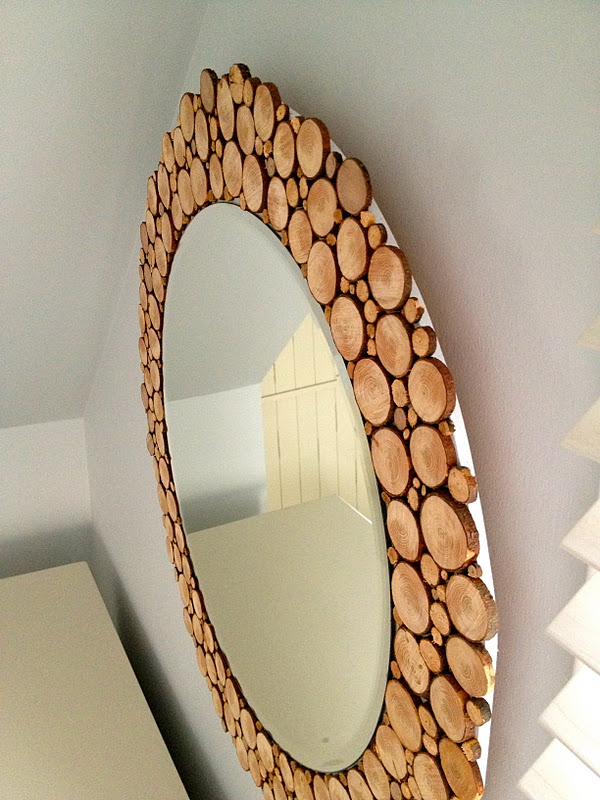
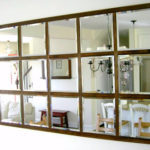
Make: A circular mirror with wood slices all around.
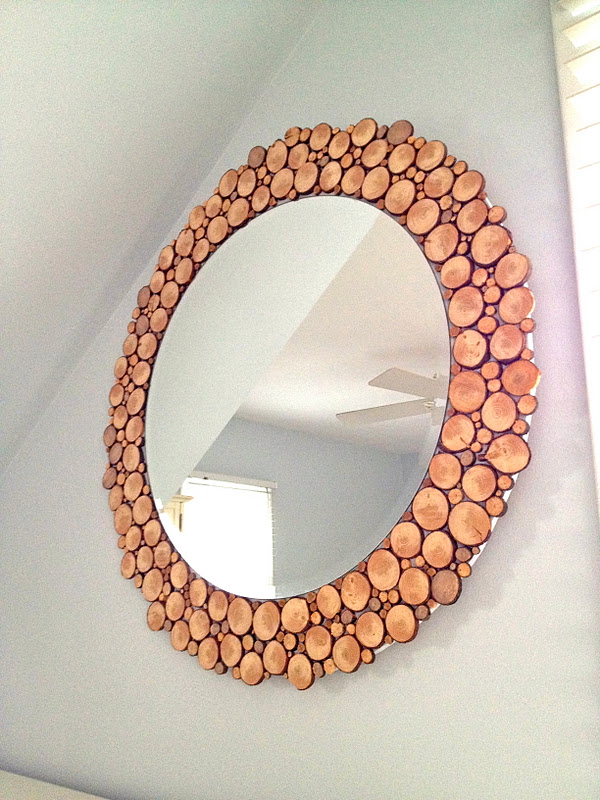


I used an Ikea KOLJA mirror adhered to plywood and glued wood slices all around:

I love all the different sizes, tones and patterns:

Part of a little Master Bedroom makeover but more importantly fills a quirky space where the roof eave cuts into the wall:


Here’s how I made the mirror:
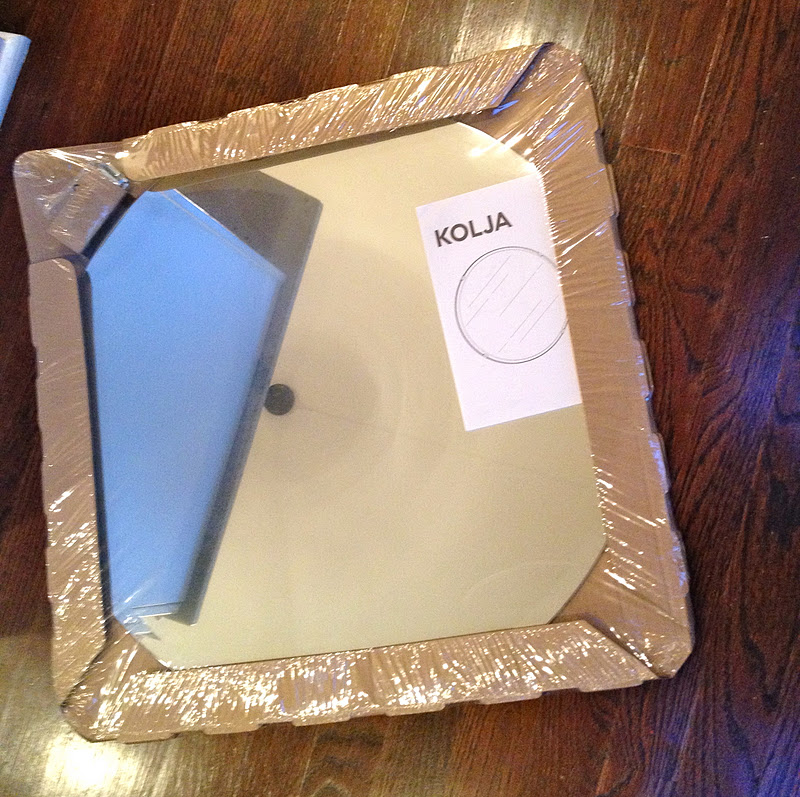
1. Purchase an Ikea KOLJA mirror or any circular mirror.
This one is 22″ round.
2. Using 3/8″ plywood, trace around the edge of the mirror onto the plywood:
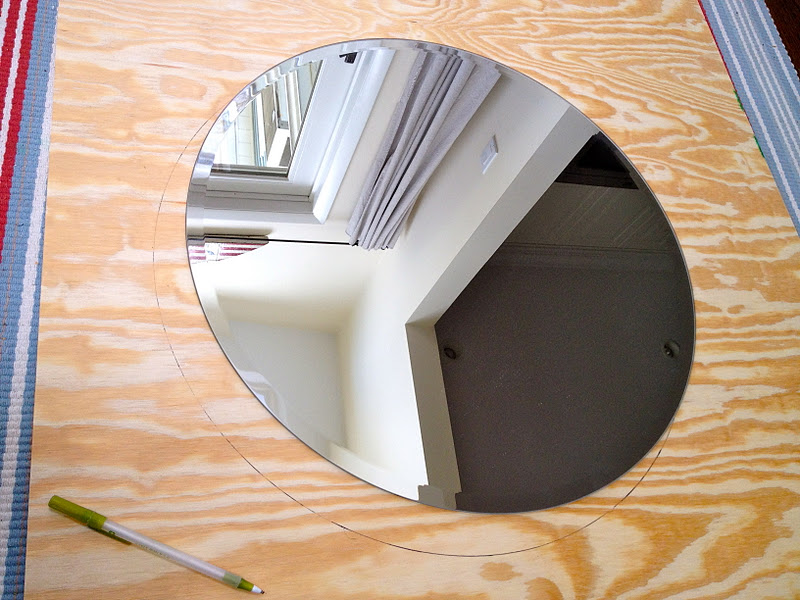
3. Now add 3.5″ all around to the perimeter of traced mirror circle:

4. Cut out the larger circle with a jigsaw:

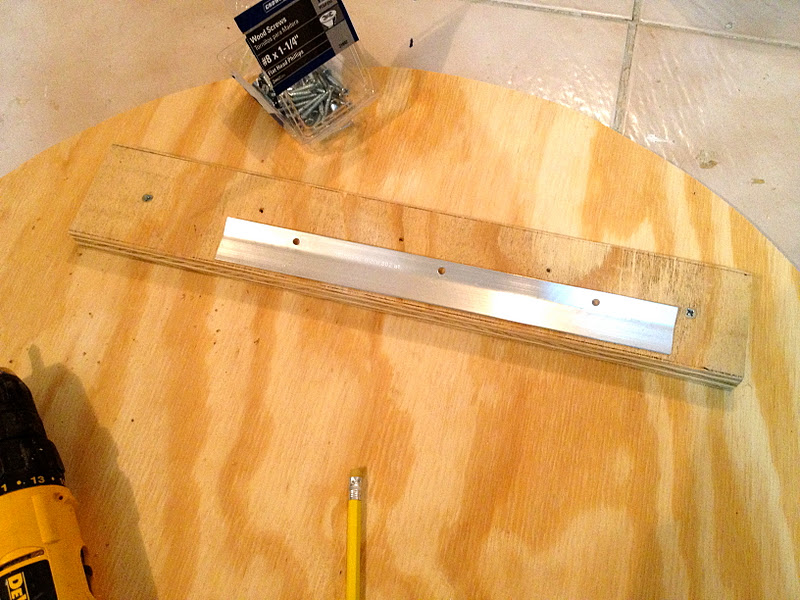
5. Attach cleat to back.
First attach 3/4″ plywood scrap:

6. Then attach cleat to scrap and circle piece:
7. Cut lots of wood slices from fallen branches:
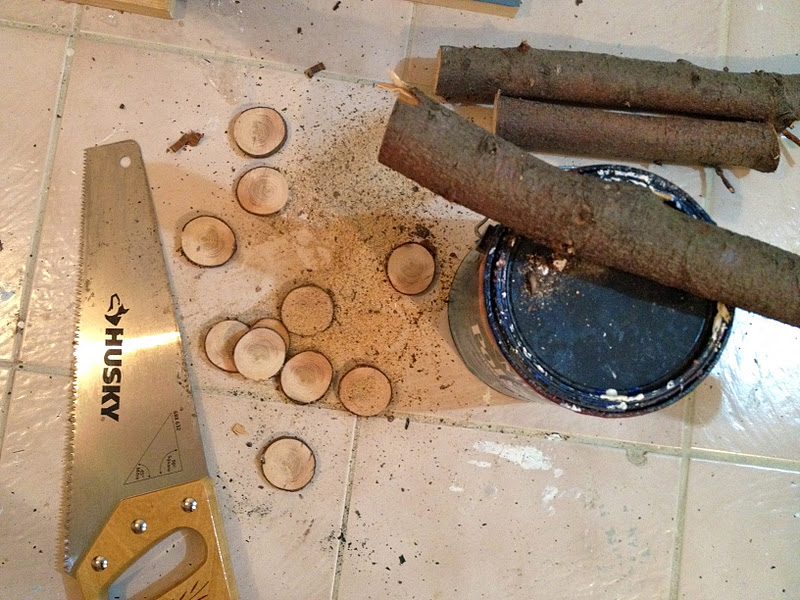
8. Keep cutting, you need lots:

9. Prime and paint the outer 3.5″ perimeter border same color as walls so any open spaces between wood slices ‘blends’ into wall.
10. Adhere wood slices with wood glue, start with bigger pieces and follow traced line from mirror edge:
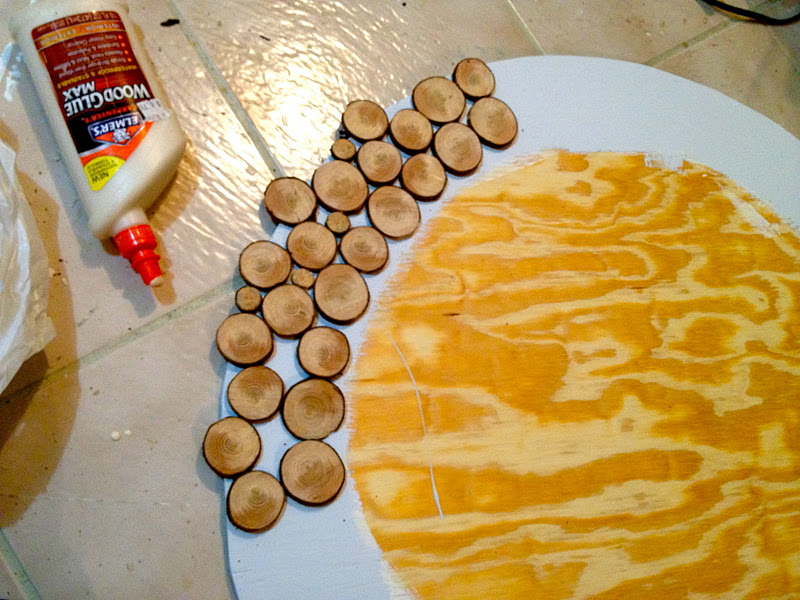
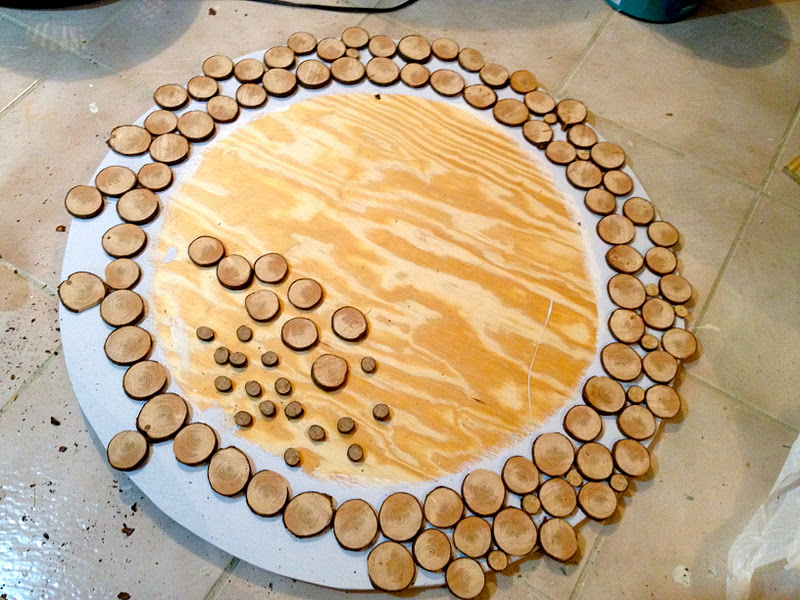
11. Keep adding wood slices to fill in the space.
The more different sizes, the more interesting the frame.
12. Apply Liquid Nails for mirrors with a chaulking gun all around middle space, stay at least 2″ away from edge:
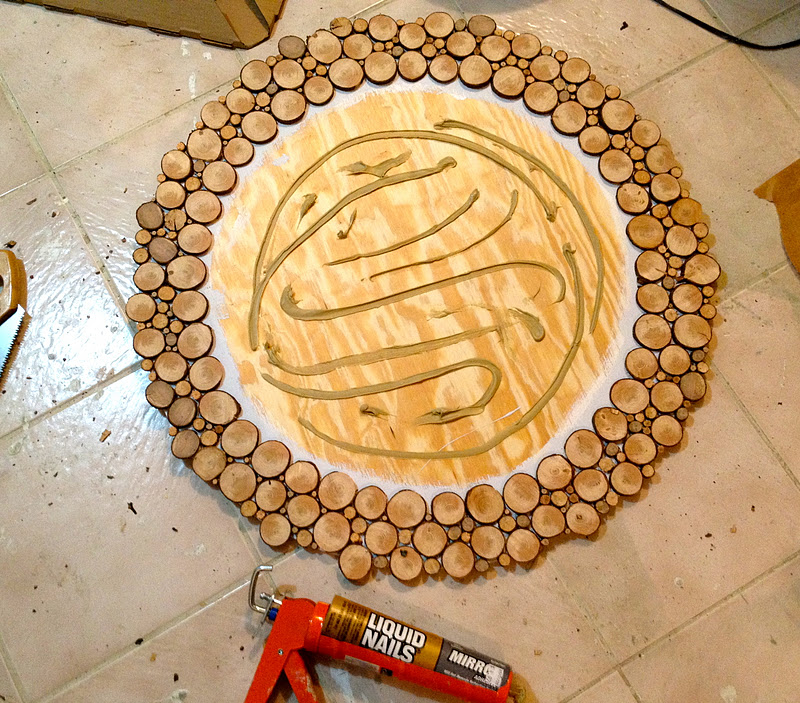
13. Set mirror in place.
Weight mirror down with heavy objects, use towel to protect mirror surface:

14. To hang, secure other cleat half to wall:

15. Gently place mirror cleat into wall cleat:
All set and you really don’t even notice the painted plywood behind all the wood slices:


The look is unique and a bit rustic, right up my alley.

I’m linking up to:
Whatcha Got Weekend @ Lolly Jane
SAS @ Funky Junk
Weekend Wrap Up @ Tatertots & Jello
Sundae Scoop @ I Heart Naptime
Sister Sunday @ Sisters of the Wild West
Sunday Showcase Party @ Under the Table & Dreaming
Just Something I Whipped Up @ The Girl Creative
DIY Fall Festival @ The DIY Showoff
Made by You Mondays @ Skip to My Lou
Making the World Cuter @ Making the World Cuter
Nifty Thrifty @ Coastal Charm
Tuesday Treasures @ My Uncommon Slice of Suburbia
Tutorials & Tips Tuesday @ Home Stories A to Z
Good Life @ A Beach Cottage
Delightfully Inspiring @ Delightful Order
Transformation Thursday @ The Shabby Creek Cottage
Strut Your Stuff @ Somewhat Simple
Share Awesomeness Thur @ The 36th Avenue
Flaunt it Friday @ Chic on a Shoestring
Tickled Pink @ 504 Main
Frugal Friday @ The Shabby Nest
SAS @ Just a Girl
Feathered Nest @ French Country Cottage
Remodelaholics Anonymous @ Remodelaholic

What a great tutorial! You make it look so easy. I love this mirror!
i LOVE this!!! love it! i am going to have to try something like it! awesome!
I love it. So different from the mirrors I see in stores.
that's awesome. i've always loved this look.
Really really beautiful!
This is fabulous!
Wowza!! So pretty, Jaime!
Aloha,
Charlie
Jaime, wow, this is simply beautiful! Thanks for sharing.
Very pretty! I always think a few wood toned pieces in a room add so much warmth.
I love this mirror! We used this same technique and made hanging monograms for our family for Christmas. We used different sized dowels, though because of the size.
Wow! Gorgeous…and I love the letter theme!
love love love!
love love love!
That is gorgeous. I love how it combines rustic wood with the glam round shape. It's so interesting and unexpected. Great!
This is just gorgeous, Jaime. It does fit perfectly into that little space above your dresser. I have a feeling you will have a lot of us copying you!
Perfect!!! I'd love to have you link it to my party that just started! Overflowing with Creativity!!! Thanks LOTS!
XO, Aimee
That is SO dang cool! I love the rustic glam look.
Gorgeous, Jaime!
This is amazing! My mind is spinning with cool ideas to do with wood slices!
I LOVE this mirror so much! What a great idea! Thanks for doing pictures along the way!
http://www.toddlindsey.com
LUV it! What an awesome creation.
beautiful! i love the nature look. great idea!
i would love it if you would stop by my blog and link this or any other amazing project you have to my linky party going on right now!
http://letbirdzfly.blogspot.com/2012/01/exodus-35-creativity-party-16.html
thanks so much for sharing!
I LOVE the mirror! Its amazing! What a great idea! I'm a new follower!
That is awesome! I LOVE it!
maxwellhouseinteriors.blogspot.com
I love your idea and I am planning on making one but I have a question about your branches. Were they dry or were they green? From past experience I know that if these "tree cookies" are green they may shrink or split and the bark can fall off as they dry leaving you with a less than desirable effect. There are different ways to dry or treat them before you glue them and certain types of trees do work better for projects like this because of their grain. Thinner cookies like the ones you use may do fine but the air in a house is drier this time of year so they may dry too fast and crack. What's your view on that or do you think it is a needless worry? Thank you for the tutorial you did an excellent job on it.
I cannot believe you seriously cut all those branch slices by hand with a hand saw. Kudos to you!!! It's a lovely mirror. It'll have to go on my DIY wishlist.
This is amazing! I want one! This is beautiful and huge props to you for cutting everything. I love this. Sharing on my facebook page.
This is amazing! I want one! This is beautiful and huge props to you for cutting everything. I love this. Sharing on my facebook page.
Absolutely gorgeous! Great job:)!
This is so rustic and cool looking!!
This is the coolest thing ever! What a great, and inexpensive, idea! Love it!
Sarah@Adventures Of Our Fami-Ly
It's amazing how consistent those wood slices look, as though there are only a few different diameters being used throughout. A super job. I'm glad I'm not the only one who likes upcycling IKEA mirrors.
I love the natural, organic look too. Something I crave in my designs!
OMG this is TOTALLY FABULOUS!!! This would go PERFECTLY in my home and I just posted a quick home tour of my house this week! What perfect timing. LOVE. THIS MIRROR.
This really is fabulous! Did you really just saw all those rounds with a handsaw? I can DO that! How long did it take you. See, I need to know because now I simply must go make one for my master bedroom makeover!I would love for you to come link up at my party going on now through Sunday night!
http://kim-toomuchtimeonmyhands.blogspot.com/2012/01/get-schooled-saturday-6-and-e-book.html
I LOVE this mirror! So unique and pretty. Y'all did an amazing job!
That looks great. I love the wood circles idea. I always wanted to do a wall or a small floor area with that. How do you know when the branches are dry enough to make the slices out of so they won't crack and break apart?
You are the most patient woman on earth! Your project looks smashing.
Thanks so much for showing how that cleat thing works. I have seen it briefly demonstrated on TV, but they went too fast for me. This was much more clear.
ETS
I am following — follow me?
Wow! This is SO gorgeous! With the starburst mirror trend taking over, I love that your mirror steps outside the box, and puts a twist on the expected. You did a great job! I'd be thrilled if you'd swing by and link this (and any other posts you'd like to show off) up to the Head to Head Showdown, going on right now at http://www.icantstopcrafting.blogspot.com ~Jen
This is so nice. I have a large round mirror waiting for attention and I may just show it some very soon. Thank you. I'm a new follower and look forward to looking at the rest of your blog:)
Geat mirror, I love it and must recreate! Thanks for sharing! I am your newest follower. Tabitha@ simplyhomecents.blogspot.com
So lovely. You did a beautiful job! Consider sharing with my readers at http://sassafrassalvation.blogspot.com/2012/01/sasss-sunday-salvation-show-7.html
That is the Shiznit Jaime! Love it and love that you include such detailed tutorials! Love~
What a gorgeous mirror! Such a creative idea and great tutorial!
I love this and to me it is the new sunburst mirror. Great job and thanks for sharing the tutorial. 🙂
very beautiful and original, congratulations!
I saw something like that here in Brazil, but the things you do are wonderful
His mirror was beautiful.
I saw something like that here in Brazil, but the things you do are wonderful
Congratulations!
Awesome. Love this! I am always looking for rustic-yet-modern decor ideas, and this is PERFECT!
love your mirror, id love to feature it if thats ok with you please let me know.
lauren
This mirror frame is absolutely gorgeous! Going to include with a sliced wood feature on my blog today. Wonderful project!
Michael
Fantastic tutorial! You laid every step out so beautifully, I'm featuring this on my blog tomorrow and sending all my readers your way for the full post.
Thanks for sharing!
I love this! My original plan was to do a mirror with a copper washer frame but I think this looks better…and more affordable! Thanks.
I love this! My original plan was to do a mirror with a copper washer frame but I think this looks better…and more affordable! Thanks.
I just love it! I grew up around wood and woodworking, this is an awesome twist on that. Kudos!
Wounderful mirror!!! I will make one very soon. May I ask one question. The Kolja mirror is 0,4mm thick. How much is the recommended height (thickness) of the wood slices? 1 cm ? I can't tell from the pictures.
Thanks!
Isn't it nice to think, years down the road, people are still finding your directions & getting motivated to make your mirror? We have hundreds of trees & I just bought a miter saw to start cutting….You see, I'm going to cut the wood slices, cut the plywood, glue on the mirrors, etc., then I'm taking a bag of wood slices & the plywood mirrors to my grandson's preschool & have them glue on the wood slices for their parents for Christmas gifts. Gotta start now so I'm prepared once Christmas comes around!!
What a great idea for the house! It looks very trendy as well. I know you posted this in 2012 but I don’t think this idea can get out of style! Thanks for sharing this, Jaime!
Beautifully done work! I really like this mirror.