• Home
  • Blog
  • About
  • Contact
    • Disclosure
    • Privacy Policy
  • SHOP
  • Widget area for main menu

    • Email
    • Facebook
    • Instagram
    • Pinterest
    • Twitter
    • YouTube
  • Skip to primary navigation
  • Skip to main content
  • Skip to primary sidebar

Jaime Costiglio

build - paint - sew

  • BUILD
    • BEDS
    • BENCHES
    • DESKS
    • DRESSERS
    • GAMES & TOYS
    • SCRAP WOOD
    • SHELVES
    • STORAGE
    • TABLES
  • TOOLS
  • PAINT
    • CRAFTS
    • FURNITURE
    • HOME DECOR
  • SEW
    • GIFTS
    • HOME DECOR
    • POUCHES
  • HANDBUILT HOLIDAY
    • 2021
    • 2019
    • 2018
    • 2017
    • 2016
    • 2015
    • 2014
    • 2013
  • GIFTS
    • BABIES
    • KIDS
    • FOR HER
    • FOR HIM
    • TEACHERS
    • WEDDINGS
  • SEASONAL
    • 4TH OF JULY
    • FALL
    • HALLOWEEN
    • CHRISTMAS
    • SUMMER
    • SPRING
    • ST. PATRICK’S DAY
    • THANKSGIVING
    • VALENTINE’S DAY
    • WINTER
  • SALTBOX PROJECT
    • BATHROOMS
    • DINING ROOM
    • EXTERIOR
    • FAMILY ROOM
    • FOYER / MUDROOM
    • KIDS BEDROOMS
    • KITCHEN
    • LIVING ROOM
    • MASTER BEDROOM
    • PLAYROOM
  • SCROLL SAW

“M” is for Mail

December 7, 2010

Every day now the kids look forward to getting the mail with great anticipation to see if there are any Christmas cards.

For the kids only the photo cards really matter, so far we only have a few but they have been coming steadily.  

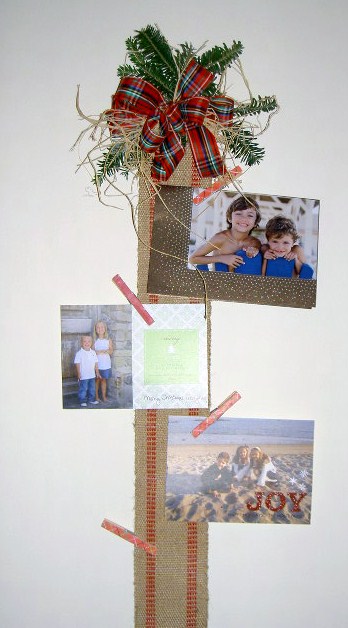
This year I wanted to display them for the kids to see so I made this super easy and inexpensive card holder.  

Here are the supplies I started with:
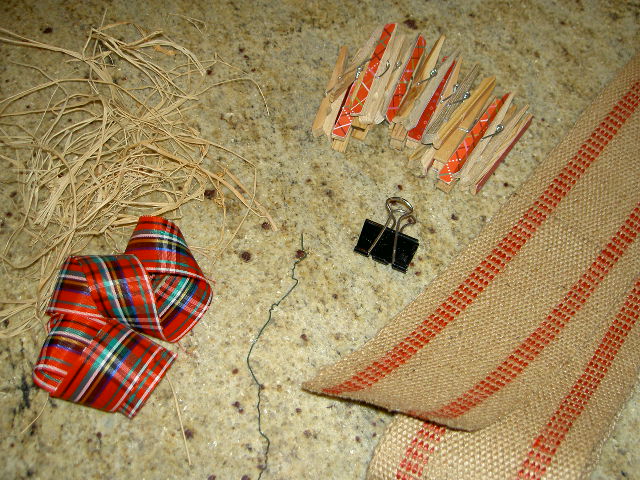
– 1 1/2 yards upholstery webbing
– medium binder clip
– 6″ floral wire
– ribbon
– raffia
– greenery
– paper covered clothespins (“C” is for Clothespins post if you want to see how I made those)
Clip the binder onto one end of webbing and make your bow with the ribbon and raffia using the wire to secure it in the middle (make it big enough to hide the binder):
See the wire in the middle with some left over to twist through the binder:

Hang the webbing:
Add the bow through the binder clip using the wire and arrange to cover the clip then stick in some greenery:

All set now add your cards (for us only photo cards will make the cut) using clothespins:
Hopefully in a few days we’ll have the webbing all filled up.
I’m linking up with Centsational Girl’s Holiday Home party:

cg holiday button

You may also like...

  • DIY Giant NutcrackerDIY Giant Nutcracker
  • Cross Stitch Monogram Ornament PlacecardCross Stitch Monogram Ornament Placecard
  • Thanksgiving Mantel with Paper PoinsettiasThanksgiving Mantel with Paper Poinsettias
  • Self Standing Ice Cream Truck PropSelf Standing Ice Cream Truck Prop
Share this post:

Filed Under: CHRISTMAS, CRAFTS, DIY, HOME DECOR, SEASONAL3 Comments

Reader Interactions

Comments

  1. Ellie says

    December 8, 2010 at 2:49 AM

    What a great idea! I like that it's kid-proof too.

    Reply
  2. AmericKim says

    December 8, 2010 at 9:30 PM

    Very clever and cute!

    Reply
  3. Renee says

    December 9, 2010 at 9:44 PM

    cute!

    Reply

Leave a Reply Cancel reply

Your email address will not be published. Required fields are marked *

Primary Sidebar

Hi! I’m Jaime

Jaime Costiglio

Hello!

Thank you for stopping by.
Join me for lots of DIY.

Read more

Get new posts via email

Handbuilt Holiday: Gift Project Plans

handbuilt holiday gift project plans

Collection of DIY gift project plans to build.

The Home Depot Tool Prospective

THD Prospective

Tools to consider for the DIYer.

Archives

The Home Depot Logo
Copyright © 2026 Jaime Costiglio · Custom site by Moonsteam Design

Privacy Policy