Funny when you build something and you’re so engrossed in the process you don’t realize the scale. That’s what happened with this giant sideboard. I was building along, minding my own merry way and then I stepped back and wham this sideboard is massive! I’m so excited to share this beast of a build with you today thanks to special help from my friend Ana White!

A DIY tutorial to build an extra long sideboard cabinet. Free plans to make this dining room storage cabinet with three large drawers and two cabinets.
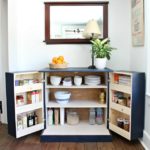
Friends this is one really long sideboard with TONS of storage. Three very large drawers in the center with two cabinets on either side makes for an impressive amount of storage.

I asked Ana to help me with a sideboard build and sent her multiple ideas which she mashed into this beauty. Truly unique and one of a kind, it’s the perfect combination of drawers and doors.

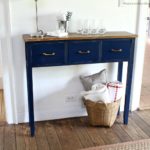
The best part about this sideboard is the height and the depth. It’s just over 40″ high which is closer to bar height but it’s only 17 1/2″ deep so it doesn’t protrude into the room. This sideboard offers 91″ of counter space for serving space.

To be honest I cannot take credit for the copper pipe hardware idea. Thank you to Katie at Mountain Modern Life for this beautiful idea which I borrowed. I just love the natural wood with the copper metal.

So yummy.

Originally for the cabinet pulls I only used one base hardware piece but you really need two to keep the pipe steady.

Ana’s plans are actually very versatile for this build. She designed it with a planked top but you could use solid plywood as well. And I trimmed out the base with something a little bit fancy but you could use any baseboard trim.


I love how the copper hardware picks up the tiny bit of copper from the wall sconces (those are diy too see the tutorial here).


Ana recommended I try these full wrap hinges. Sure enough she was right and these hinges are awesome to work with. Easy to install, very secure and the best part is the slim profile.


See how the hinges are barely noticeable? But don’t look at that small gap in the right door, upper corner – it reminds me that I’m not perfect :). I’ll blame it on my circular saw for not cutting that plywood totally straight.


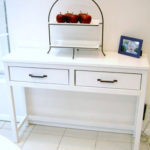
The drawers are nice and deep and can hold nearly anything. Below is a regular 11″ dinner plate:

A huge thank you to Ana for making these plans. This build is something I should’ve done long ago and I’m kicking myself I waited so long. If you’re looking for a big furniture piece with lots of storage space and a counter surface then I highly recommend this sideboard.

Below are a few building process tips and details from along with way. Be sure to read through the plans entirely before beginning and always use caution with power tools.
Supplies:
- miter saw
- circular saw (or table saw)
- sander
- pocket hole jig
- drill and drill bits
- nailer
- wood glue
- wood screws
- 4 hinges
- 3/4″ copper pipe and fittings
- pipe cutter
Follow Ana’s plans here. I recommend making your cuts as you build and be sure to measure carefully.

Step 1: Build the carcass. I used my Kreg pocket hole system to construct this piece and I always build face down to be sure the front is flush. I added 2 support pieces near the center because the cabinet is so long I feared sagging. Cut down 2 scrap pieces of plywood and secure under the center drawer section.
Definitely consider whether you want your cabinet shelves fixed or adjustable. I’m happy with fixed shelves especially in this case where it adds strength in the center of a large open cabinet. You could make the other shelves adjustable using the Kreg shelf pin jig.

Step 2: Add the face frame.

Step 3: Build the drawers to fit. Measure. Measure. Measure before you cut the drawer pieces. Also note I used 1/2″ plywood for the drawer bases secured with 2″ screws. This allows me to fill up the drawers with heavy dishes and not worry about support.

Step 4: Construct the door fronts. I used Ana’s method here because I do not own a table saw and making dados with a router is not my idea of a good time. Yes there are a lot of pocket holes that should be plugged but I’m thinking of covering the whole piece with fabric or wallpaper in the future?

Step 5: Sand and finish. I choose to keep the wood natural with 3 coats of clear satin poly.

Step 6: Make the hardware pulls. I used 3/4″ copper pipes cut down to size using a simple pipe cutter. I borrowed this idea from here.

Step 7: Clean the copper with ketchup. Wash and dry then use steel wool for a really smooth finish. I also sealed the copper with clear semi gloss poly spray to keep fingerprints at bay.

Step 8: Attach the hanger to the wood, I used 2″ wood screws on the drawers and 1 1/4″ on the doors.

Step 9: Insert the pipe and secure the other screw. I attached the caps before installation using super glue on the pipe ends to be certain they don’t fall off.
Be sure to follow along on social media for project updates and sneak peeks:
SHOP THIS PROJECT:


I absolutely LOVE this! What was the cost? Jess
So beautiful! And I'm on a copper kick too! Love your sideboard – it turned out so amazing!
such a fantastic piece! you have skillz!
So awesome! Definitely pinning. I love the bare wood look!
Such a gorgeous sideboard! And I love that you left it natural so the wood could really shine
Wow, that is amazing! Such a huge work surface and tons of storage. This is exactly the kind of piece I need for my dining room. LOVE the copper hardware!
This is gorgeous Jamie! I love the copper, too! And I am totally going to get those hinges for the media console we built. The other hinges are awful. Thanks for the tip!
Love the copper pipe hardware!
Love the sideboard … but I also happen to love your flooring, too! What kind of tile is that??
Love this – but I can’t make it as long! I’ll see if I can figure out how to do that! Great piece!
Greetings from Dallas/Fort Worth. This looks wonderful! I’ve been looking for a sideboard to fit a wide space in my kitchen/dining nook. Ideally I’d want to put in a 2nd section above, but
I will need to change dimensions to fit my 79 1/2″ wide and 35 3/4″ high space. Any suggestions on where to shave off inches? I was thinking of just scaling down everything proportionally, including the drawers.
Hi Heath, I agree with you on scaling down everything proportionally to accommodate your dimensions. Ana and I both use SketchUp for drawing plans, I believe there is a trail free version. It does take a minute to learn the program but once you have that tool as a resource you can sketch anything you need. I start with my final dimensions and work backwards. Good luck!
For the doors, do you cut 1/4 inch smaller than the opening to allow for gaps on the sides?
Hi Marissa, yes the doors need to be a 1/4″ smaller to allow for an 1/8″ gap on all sides.
Hi! This is gorgeous! Do you have a link to the plans? What was the cost of the build? Thank you!
Hi Nicole, The link to the plans is above in the post but I will leave it here as well: https://www.ana-white.com/woodworking-projects/extra-long-buffet-cabinet
Cost varies greatly depending on where you live and source your lumber. Best estimate is to take the supply list and calculate from your lumber source.
Quick question about the plywood used. Do you use regular 3/4″ plywood or smooth finish plywood? Thank you!
Hi Jen, For the plywood I typically use 3/4″ birch which is smooth.
I love the looks of this. My stepdad has volunteered to make one similar, however I want drawers on each side and an opening in the middle. I’ve looked through plans and can’t see, to find the dimensions of the drawers, any way you could post that. Dimensions of inside of drawers? Thanks
Hi Patti, glad to hear you’re getting the sideboard. We have loved it for many years now – so much storage!! For the drawers they are sketched in Ana’s plans on Step 7 – the interior dimensions are 31″ wide x 12.5″ long and this is if you are using standard 1/2″ clearance drawer glides on each side and 3/4″ lumber. Hope that helps.