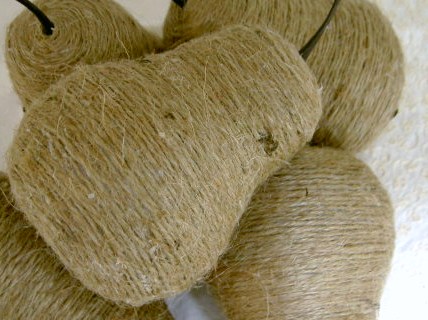
Jute covered pears.


Jute ranks right up there with drop cloths, distressed white paint, burlap and rope – love.
A little knock off of Ballard’s giant jute pears.

image from Ballard

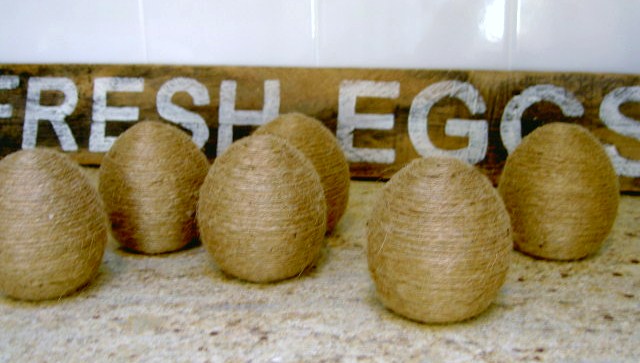
And how about some jute eggs for Easter?

Here’s how I made the pears:
(I used the same method for the eggs.)
1. I used newspaper mache pears from Michaels ($1.50 each) but regular plastic pears would do and standard jute string.
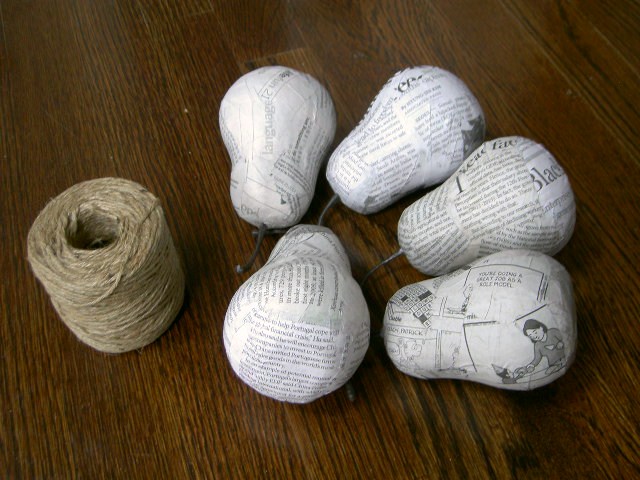
2. Start at top, glue near stem and wind jute adding glue every few inches.

Too easy. So why pay $25 for Ballard’s giant pear when you can have a whole vase full for a fraction of the cost?


Let’s see what else I can wrap in jute.
I’m linking up to:


The pears turned out great Jamie!
Those look great!
those are way too cute! I went on a jute frenzy 2 summers ago and wrapped just about everything I had in jute. I still have a bunch and continue to use it with some projects. Why didn't I think of this?
Meg
Fun project! They look great all together in the vase; much more impressive than just one from Ballard's would be.
Oh my gosh these are so totally cute! I found you at a linky party…not sure which one. I have seen the Ballard pears and wondered who really bought them for that price. I really like them in the glass vase. Well done! I'm a new follower so if you have time follow me back to my blog for a visit. Thanks! ~Ann
The pears look great! what a cute project!
I love these! Rustic, simple yet elegant.
Wonderful…I love them! You did a really tidy job of wrapping the jute around the pears! Did you ever burn your fingers with the hot glue?
This is a fabulous idea! I'm doing a little kitchen table makeover, and a vase of these pears will go perfectly as the centerpiece.
I'm your newest follower! Stop by my blog sometime–I'd love to have you as a follower, as well! 🙂
morrowsunshine.blogspot.com
Love, love, love them! Thanks for sharing please stop by and say hi sometime!
SO pretty!!!!I'd love it if you Linked up to the Glitter Party!
http://runwithglitter.blogspot.com/2011/03/weekly-tues-thurs-link-party.html
this is fabulous! I have some plastic pears that i'm sick of looking at and are in desperate need of a makeover! Thanks!
~ Jill from 'Just dream, Jelly Bean!'
What an awesome idea! The pears are too cute! LOL. Thanks for sharing,
These are so great looking!! I'd love for you to submit this to the M&T Spotlight at http://www.makeandtakes.com/spotlight
ooh cute! I think I need to make some for my kitchen! Thanks for sharing, I'm a new follower! 🙂
Love it!!! I have not ever tried that…This I can do!
I LOVE these. I have a bowl full of faux pears that I think need a makeover! Thanks!
Stop by my blog if you get a chance:)
These are fabulous…looks like and fun and easy project to do and they look so expensive!
I love your knock off pears! You did a great job.
i would love it you shared this at my party! you did a fabulous job, looks great.
http://typeadecorating.blogspot.com/2011/03/anything-goes-party-10.html
These are fabulous!
I'd love if you would link up to my Tuesday Idea List party
http://www.StashHappy.com
I love a good knock-off! These are so cute! And they look great in the hurricane. Stealing this idea from you! Thanks for sharing over at Flaunt it Friday!
Jen
Scissors & Spatulas
Yes, those are fantastic! Anything wrapped in jute HAS to be! 🙂 Great job, love the look!
Goodnight those are fantastic! I love this idea… thank you thank you for sharing! How creative!
I think I'd be doing this to everything in my home. Now you have me thinking about what I can wrap up. Too cute! Thanks for the tutorial.
Love 'em! I saw the big one in Ballards and thought I need to make that…but of course I haven't gotten around to it. Glad you did. :)Thanks for linking up to Flaunt it Friday!
How cute!!! What a charming idea and looks so easy to make too- thanks for sharing at FNF! 🙂
Stopping by from the Friday Blog hop.
I am a new follower
Have a great weekend and stop by any time.
Hand Crochet Photo Props and more
Etsy: http://www.etsy.com/shop/ThisanThatBoutique
Blog: http://thisnthatboutiqueblog.blogspot.com/
These are super cute!
Megan
http://www.CutTheCraft.com
What a great idea. They look just like the Ballard pears.
Rhonda
I JUST bought those pears last night to cover with jute!!! Then I saw yours featured this morning and squealed! 🙂 This is exactly what I imagined.
And the eggs are awesome too!
Great idea.. over from Feahtered Nest
I am so going to try this for my kitchen redo
i love those jaime!!!! i want to copy! ; )
These are just so gorgeous! I love them! I am off to look for something to cover in jute! X
Those turned out great!
Oh yeah letter lady that's a good one!! I've done the jute eggs but I'm a little in love with those pears!!! I'm so doing that- they are great!! Just when I think I've seen it all someone inspires me some more!!
Someone after my own heart! I want to wrap my house in jute. With burlap shutters. And dropcloth drapes. After I paint the inside distressed white.
LOVE the pears!!
So beautiful! I love them.
Jaime these are wonderful! Please go link this up to my party today! I love your projects =)
I love how they turned out! Great job!
These are super cute!!! Thanks for a great and easy idea!!
So cute. I made jute letters at Christmas and loved them. I agree that you start looking around for what else could be wrapped in jute. I'm adding this idea to my inspiration file so I don't lose it.
Jaime I almost made one of these this past week for a cloche in my bathroom! Then my daughter found me the cutest little bird for a buck at the dollar store and it won lol. Less time and money but someday soon I swear I'm making bunch of these, I love them so much.
F is for FABULOUS. So stinkin cute! Thanks for the great tutorial 🙂
We would ♥ to see this in our current linky party! Feel free to stop by 🙂 lollyjaneboutique.blogspot.com
Love these!! They are now on my list…
hiya jamie , lovin those pears and your tutorial is great x i am visiting from homemaker on a dime and i am your newest follower hopr you will stop by mine sometime
xmaggiex
I love your pears! They look fantastic in the clear vase!
Melanie
youmadethat.blogspot.com
Wow! What a great knock-off!!!!
🙂
Ps. I'm following from the blog hop on homemaker on a dime, glad I found your little Internet corner!
Very cute pears! You have a lovely blog. I am following from from the Homemaker on a Dime.
Take care,
Ana Paula
oh my gosh these turned out so good!!!!! love it
PS: I'm doing a giveaway on my blog for $20 to my etsy shop, so if you like pretty jewelry you should come enter!! http://mygirlishwhims.blogspot.com/2011/04/my-spring-fling-giveaway.html
What a fun idea. Thank you for sharing.
Just visiting your sweet little space via FJI SNS. These jute pears are fabulous…
I love jute too and burlap.
I'm in the middle of a jute project right now, can't wait to try this one.
Cindi
http://www.rustiqueartblog.com
Love your pears! I need to use more jute. I'm already a big fan of burlap and drop cloths, just made a table runner. Thanks for a new idea!
Hey jute girl,this is beautiful!!love it!
Check out a jute oroject bacl on my blog, you might like it!!
I am a jute girl too!!
http://thesimplecraftdiaries.blogspot.com/2011/04/jute-yarn-key-frame.html
Andrea
I LOVE these! I will definitely be copying your idea!
I love these I am going to make some as soon as I can. What a wonderful look. ♥
Come by and visit sometime
http://ourcreativehands.blogspot.com
Very cute! You did a fantastic job!!
I have wanted to do this project for ages but just didn't have the patience! Your pears turned out great! I love how they look in the glass vase. Great job!
Oh those are cute! I even liked them with just the paper mache. Thanks for sharing ;-).
Brittany
Great job! Thanks for sharing. Saw you on Kristin's blog.
I love those! I'm going to make some for myself! You have amazing style and great projects. I can't wait to see what's next! I'm a new follower from the Homemaker on a Dime Party and Hop. I'd love for you to stop by.
Sam
thejunkhouse.blogspot.com
I'm going to share your pears and eggs on my site tonight. I hope that you don't mind. I just love them!
Jen
Scissors & Spatulas
You induced my creative juices about wrapping stuff with jute! Thanks for the idea 🙂
OMGosh!! Love these pears! I think I may have to go out searching for pears and jute!! (=
I am so stealing this idea! I was looking for something to add to my front and back porch, on the little side tables, and these will be it! Yes, they are not really made to be outside for long but at this price? Who cares! LOL
Thank you so much for sharing this tip with us! Love them!!!!
MariaS
http://marias-digitalscraps.blogspot.com/
Hello! I am over from Homemaker on a Dime's blog party. These pears are so cute, great job! Now don't go crazy with the jute — you wrote "what else can I jute?" I don't want to see your next post showing that you used the jute on your hubby or your child! 😉
Best,
Gloria
Wow! These are very cute. I'm cracking up because I tried to do this last week but then my kids got involved…and let's just say – disaster. I'm going to try again this week (while they're at school)!
Love your blog! Just found you through Centsational Girl!
Adorable. Creative. Genius.
I am having a spring craft linky party and giveaway on my blog this Friday. I would love for you to showcase this wonderful project.
Details are on my blog today.
LOVE these! I am going to have to "lift" this idea!! Thanks!
I love them!
I have a question, how did you get all the link party thumbnails so small at the bottom of the post? I'd like to do that as well.
I absolutely adore the way these look…so understated and perfect…
Love these! I just 'juted' (is it now considered a verb?) some styrofoam balls and loved them. I think some jute pears will be my next foray into the wonderful world of glue guns and jute! Thanks!
P.S. I'm your newest follower!
These are great, I'm juting just about everything that gets in my way lately, fruit, eggs, styrofoam. It just looks great! I'll have to post my menagerie! And I love your blog. I'm your newest follower!
Marianne 🙂
Hi Jaime! I LOVE the projects you have on your blog… very well done, and VERY inspiring.
It was so fortuitous that I stumbled upon this project this morning, so much so, that I had to post about it on my blog today. I mentioned your blog and provided several links back to your tutorial here (I made jute eggs today, thanks to this post).
Thanks again for the inspiration 🙂
~Stephanie C.
Super cute, Jaime! Everything you do has great look to it! You're awesome!
Roeshel
LOVE! And jute is so inexpensive! Off to look for paper mache fruit at Michaels!
Those jute wrapped eggs are so clever and so cute. I love jute. I made some jute-covered letters at Christmas – may have to try some jute covered eggs for EAster now.
Love your blog and this project with jute – so fun and summery! Just wanted to let you know I featured you in my roundup of jute craft projects here. Feel free to check it out if you want and hope you like it! : )
-Mel the Crafty Scientist