Today I’m sharing the DIY vanity I built to fit around our wall mounted sink. And I have the free plans available down below if you’re in the market for something similar. This is why I DIY friends. No where on earth could you purchase this vanity. It is completely custom made to fit this sink and I’m super proud to say I built for my home.

A DIY tutorial to build a wood vanity for the bathroom. How to make a vanity surround for a wall mount sink complete with free plans.
We recently renovated the master bathroom and installed this wall mounted sink that I found headed to the junk pile. Immediately I knew upon finding the sink that I would be building some sort of DIY vanity surround.

Vanity Necessities:
- hide the plumbing
- provide storage both open and closed
- create counter space
Behind those closed cabinet doors is the ugliest trap pipe you’ve ever seen. However, it’s essential to the wall mount sink and provides additional support to the wall cleat. So short of asking my plumber to reinvent the trap (I have seen other versions online) we opted to keep the trap. Note this is actually a new trap because the original was GROSS. Also we have water lines in the floor because there was no option to get them up in the wall in our 1740 antique home. In light of all this, I had to build a piece to cover this hot mess but still have access to the plumbing lines.

I didn’t really want all those pipes visible in my beautiful new bathroom.
But I did want a vanity that had well thought out storage! Including the perfect spot for extra toilet paper.

Also you can see I had to change the far right legs to 1×2 versus 2×2. I really wanted that shelf to be wide enough for toilet paper so given where the sink was installed I had to switch to a skinner leg. It doesn’t bother me and I think it’s worth it for the storage. The plans below have the original 2×2 leg but you can adjust to fit your situation.


* This post contains affiliate links below, by clicking on an affiliate link and making a purchase I may receive a tiny commission. This small commission helps me keep this site full of free content so I thank you for your support. *
Finish:
I stained the vanity using Minwax stain in Early American . Then sealed it with oil based clear satin polyurethane
 using 5 coats, sanding in between each coat. My husband is a serious sink splasher and I wanted to be certain the wood is well protected.

This DIY vanity does its job perfectly and looks amazing, what more could I ask for.

Vanity Hardware:
A little more about the cabinet doors hiding the ugly pipes. I choose this hardware cupboard catch and these partial wrap hinges in satin nickel
 .
.

I don’t have a picture but on the interior of the doors I had to carve out a bit to make space for the pipe parts. Because I removed a bit of the door trim there wasn’t enough thickness for the cupboard catch hardware screws to grab in to. So I added the extra little flat moulding pieces at center front to make the hardware work. If you are building something similar consider the depth carefully. I could’ve saved myself from this problem by adding an 1″ to overall depth.
Below is a link to the DIY vanity plans and some in process photos. Be sure to read through the plans entirely before beginning and always follow all safety precautions when operating power tools.


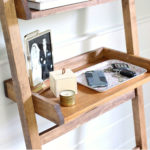
Above is a test fit, you can see I notched out the top boards to fit around the wall battens.

I definitely suggest finishing the piece before installation. Step 13 is the final install and you may consider attaching the vanity to the wall somewhere but my piece is pretty snug and it doesn’t budge.

To install the cabinet doors for this DIY vanity I borrowed this card trick from my friend Brad at Fix This Build That. This trick helps to get equal spacing around the doors, especially at the top and bottom. Attach the hinges to the doors, re-set the cards and mark the hinges on the legs and you’re golden.
For more details on the sink itself see my post here.


SHOP THIS PROJECT:


This is beautiful. I love it.
wow this is breathtaking!! great job 🙂
Great vanity!!! What kind of wood did you use?
Thanks. It’s basic stock lumber from Home Depot. Pine boards and plywood.
Am I a dork? I can not see the plans for your vanity anywhere
Hi Lorraine, the link to the plans is in the post above – directly below the digital sketch. https://drive.google.com/file/d/0B85dRd-BoH0wdGNXVDFqd25MSlE/view Hope that helps.
Thank you so much!