Don’t let that space under the bed go unused! Maximize the functionality of all that square footage and make easily accessible underbed storage bins on wheels. I’m sharing quick, simple and easy free plans down below.

A DIY tutorial to build storage bins to fit under the bed. Make that underbed space 100% functional with storage bins on wheels.
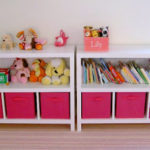
My girls recently bunked their beds but whether your beds are bunked or not truly doesn’t matter because there will almost always be unused space under the bed. That dark underbed space where the monsters live is prime real estate for some serious storage!


Underbed Storage
- makes use of unused space
- storage clothing, shoes, accessories, toys
- easy for kids to use
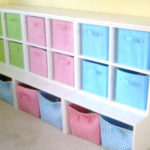
These storage bins are made from 1/2″ plywood painted white with wheels attached. They are very basic and simple but help to keep all the things exactly where they are accessible and organized. In hindsight I probably should have added a hardware pull. Maybe a handle or cut out finger hole would be great but they are easy enough to grab and pull out just as boxes.

Consider Your Underbed Space:
- First I measured the length of the unused empty space then subtract 10″ or so for ample spacing between bins. These bins are each 21″ wide and there’s plenty of room for movement.
- Next measure the depth, my bins are 40″ deep and still hide just enough under the bed.
- Lastly measure the height. For the height you want to take into consideration your wheel height and leaving a bit of open space at top to grab the bin (or less if you’re going with hardware pulls). My bins are 7″ tall which is plenty. I’m a firm believer that kids do better with shallow drawers and bins. If you make the bins too deep all the clothes get piled and lost and nobody can find anything.

Supplies:
- 1 – full sheet ½” plywood
- #6 – 1 1/4” wood screws
- ½” wood screws
- wood glue
- 5 – 1” stationary wheels
Cut List:
- 2 – ½” plywood @ 7” x 39” (long sides)
- 2 – ½” plywood @ 7” x 21” (short sides)
- 1 – ½” plywood @ 21” x 40” (bottom)


Thanks for joining me for this underbed storage bins project. Please leave any questions in the comments below and be sure to follow me on social media for sneak peeks, tools and project inspiration:
Instagram / Pinterest / Facebook / Youtube / Twitter
SHOP THIS PROJECT:


Great storage solution.
OMgosh! Love it…..the room is looking perfect! You never get enough storage in a girls room!
Jaime, that was a brilliant idea. You can never have enough storage, and these look great too!
So cute! You can never have enough storage!
Stop by the Beach Bungalow sometime soon and say hello!
Sue
xo
Wonderful and so neat! My daughter definitely needs these. Under her bed is scary! Your under bed storage is really great!
Those storage bins are fantastic! I need to make one for our pantry. You are such an inspiration Jaime!
-Rene
What a great solution. It looks clean and neat (and easy to access, too).
Wow. I am really loving this room. It looks like a photo out of a magazine.
Denise
Extreme Personal Measures
Great idea Jaime! Wonderful extra storage.
Kim:)
Wow, what a great idea. That's awesome storage. I am a follower. I would love for you to come and check out my blog and follow me back. We are neighbors…I am from Rockland.
Wow, you are truly amazing, what a great storage solution! I so wish I had an ounce of those skills.
This looks fantastic – streamlined and organized. Makes me smile!
so cool… love that storage idea!
I love this idea! I am going to copy you for the sofa area in my 320 square foot home – this will be perfect!
That's a great idea–love it! I think I'm going to have to make some for my boys.
lucky girls! love the storage bins and the darling letters too! once again, just visiting from a to z
Love this idea!
What a great tutorial for storage. I like the simple lines with the girls bunkbeds.
Fantastic idea! Thanks for sharing your tutorial at A2Z!
Excellent idea! Love those heart sheets and initials too!
i love all your updates, but that rolling storage is genius! that was definitely wasted space before, and it even looks cuter now! fantastic job!
love the idea of under the bed storage.. great job on the boxes. Those letters are so cute.
Love these, just went and bought the wood for them to go under my boys new bunk beds! Thanks for sharing such a wonderful idea to add storage and clean up their new room!
love it! I think the drawers would look nice with a 2 drawer pulls on each one that match the dresser! : )
Whaddup! Here I am, browsing Pinterest for kids' storage solutions, and who do I find?? My blog bff, Jaime! I've pinned this and will be linking to it in my post either tomorrow or Thursday. 🙂
You're a rock star!
Aloha,
Charlie
Did you nail these together? It doesn't look like you screwed them. If so, what size finish nails did you use? How thick is the plywood?
Thanks in advance.
I am curious about the relative age of your girls…mine are pretty young, and I am wondering if the drawers are heavy??
I am curious about the relative age of your girls…mine are pretty young, and I am wondering if the drawers are heavy??
what a great idea! totally pinning this for later use! and i love the heart sheets! where did you find those?
Just did almost exactly this project this month. It really helped in decluttering the house.
Where did you get the bedding from?
The heart duvet covers are from Ikea.
Did you make the bunk bed? or did you buy them somewhere? If you made them could you show us how you did that? Thanks a bunch. I just discovered your blog and i LOVE it
Thanks. The bunk beds were hand me downs from my parents and bought at retail (I believe Ethan Allen many moons ago) and I painted them white.
I need to make some of these and have a pretty good handle on how to do so except for how you fastened it all together. Did you use wood glue or screws? Thanks!
I used wood glue and countersunk screws. I recommend a minimum 1 1/2" #8 wood screw. Good luck!
Thank you fir giving me an idea and info about building storage boxes for my kids’ bunk bed (http://alekdavis.tumblr.com/post/135459146234/how-to-build-a-toddler-bunk-bed). I am wondering: was there a particular reason why you built three bins instead of a single big one? I think one would look a bit cleaner and you wouldn’t need to worry about aligning them every time you use them (yea, it’s important, at least for those of us with the obsessive compulsive diagnosis 🙂 ).
Glad I could help. One big bin would be too heavy for young kids to maneuver – I guess it depends on the ages of your kids.
Makes sense. Thank you.
Could you please tell me the exact height under the bed? Your boxes are 7″ + wheel height plus room for kids to grab drawers. What would that total be? I am a total beginner and want to make my son a bed with these storage boxes underneath. So I am going to adjust the bed to the height of yours so I can just make them pretty much exactly like you did. Thank you. I love these bins. So practical.
Hi Kinga, These bins were built a long while back at our previous home and the bunk beds were left with the new owners so I don’t have exact measurements. I will say you want enough box depth to hold things so that all depends on what you are storing but 7″ is sufficient for most clothes. Also you could drill a finger pull hole or add hardware for kids to grab. And wheels come in all sizes so you can fit the box into your space, I’d leave at least 1 1/2″ for the wheels. Good luck!
Hi, I was just wondering how far off the ground the beds were. Like how much clearance room you had from floor to the bottom of the bed?
Hi Kayla, I’m not exactly sure on the floor to bed clearance (this was at our previous home and we don’t have these bunk beds anymore) but the bins are 7″tall and the wheels are at least an 1″ so I’m guessing the space is about 10″.
Thank you for sharing your ideas!! I really like it. I am going to try to make my own
Beginner here. I love the project but I have a few questions.
– Which screws go where?
– And do you drill the full length of the screw depth?
– What size drill bit?
This opens up a world of possibilities if I can get the basics down.
Thanks!
Hey,
Just what I was looking for. Loved the simple plans and designs. Keep up the good work.
Thanks again.