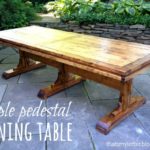
Going round has it’s advantages so I decided to build an X base circular dining table. You can definitely squish more chairs around a round table and it’s much easier to navigate the room without sharp edges.

A DIY tutorial to build an X base dining table with a circular top. A modification on an Ana White plan by changing the top to a circle.
I built this circular dining table with an x base using plans from Ana White here and modified the top support pieces and created circular top design. I thought I’d share the modifications for those interested.

Placed in the center of our antique farmhouse living room I love how the lines of the X base make a bold statement marking the table position. And the contrast between the sharp X angles on the base and the soft round circular shape of the top is so good.

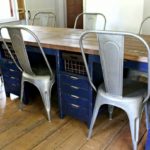
The X pattern is repeated in the tabletop design when you’re looking from above. We in our living room, a room that was hardly ever being used, so I decided to make it into an work space with my workbench style desk and this additional dining table for overflow during the holidays. It’s wonderful to have another surface for homework, projects, or to spread out the newspaper and have coffee.

This table easily accommodates four adults but you could probably fit six people no problem.

I just love the chunky 2×6 construction combined with the 2×4 cross pieces that divide the table so neatly. This is basic off the shelf lumber from Home Depot, nothing fancy here.


To get this smooth curved edge I used Rogue Engineer’s tutorial here. Jamison shows you how to build the jig for the router and make multiple passes using a spiral upcut bit.

I definitely don’t mind sharing my new workspace with my kids as long as they’re being productive. Below are the modifications I made to Ana’s plans. Be sure to read through entirely before beginning. Use Ana’s plans here for the base construction with the following modifications in BOLD:
Cut List:
- 2 – 1×4 @ 11 5/8” 15 3/4″
- 1 – 1×4 @ 26 7/8” 35″
- 2 – 1×4 @ 13 1/4”
- 1 – 1×4 @ 30”
- 1 – 4×4 @ 21 1/4”
- 8 – 4×4 @ 13” (longest point measurement, both ends cut at 45 degrees off square not parallel)
- 1 – 4×4 @ 36” (longest point measurement, both ends cut at 30 degrees off square not parallel)
- 2 – 4×4 @ 16 1/4” (longest point measurement, one end cut at 30 degrees off)
- 4 – 1×4 @ 5 1/4” (one end cut at 30 degrees off square, longest point measurement)
- 2 – 2×4 @ 14 1/4” 18 1/4″(one end cut at 30 degrees off square, longest point measurement)
- 1 – 2×4 @ 32” 40″ (both ends cut at 30 degrees off square, longest point measurement, ends NOT parallel)
TOP is cut to fit

Step 1: Construct the base using the increased top support measurements as listed in the cut list above.

Step 2: Construct the top using the 2×4 cross as your starting point cut the 2x6s to fit. Use pocket holes in both directions and on the angled cut ends. Be especially careful of where you place the end pocket hole on the last board (marked by yellow arrows), try to inset at least 7″ so pocket hole won’t be visible once you cut the circle.

Step 3: Make the router jig using Rogue Engineer’s tutorial here. It will take multiple passes with the router increasing the bit depth each time. Definitely consider your jig board thickness before beginning: I used a 3/4″ board for my jig and I couldn’t get the bit deep enough to make the final pass on the 1 1/2″ thick boards. I ended up flipping over the table and making the cut from the underside.

A detail shot of the spiral upcut router bit results. So smooth!


Step 4: For additional support on the end curved piece attach 1×2 boards to underside.
For the finish I stained the table using a mixture of Minwax classic grey and dark walnut followed by clear wax. Place the base in position and attach the tabletop from the underside.


This is really beautiful, Jaime!
Jaime, this table is incredible. You did an amazing job. I think Rob is going to try and give this a whirl hopefully soon. We would love a circular dining table. 🙂
The table you made is gorgeous!
Love your table, awesome job!
You are really talented. Love the beautiful table you made. It's gorgeous!
Thank you so much for posting the tutorial!! I just made the table and your instructions made it all so much easier! Jen
hi… just wondering how much did it cost to make this table?
What was the final size of the table?
how many 2×6 did this table take to make?
I used your plans and it turned out great. Fitting the pieces in the x took some extra boards it was hard to get the exact measurements but I got it done. Stained it grey and used apple green chairs. It is really cute.
I worked on the base of the table today, following your adjusted measurements. I ran into a problem, though, when I went to add the 4x4s to the bottom. The measurements are definitely off. I went back to look at the measurements that were changed on your site, and the bottom measurements were increased, although the length of the 4×4 to attach to the bottom was not increased. Am I missing something? Thanks in advance for your help!
@AllisonPrince Correct. I didn't change any of the 4×4 measurements from Ana's plans. Double check your adjusted cuts, the only measurements I changed are on the top support (table support) portion.
I couldn't tell what type of wood you used. Was this all pine or cedar? If it was pine, how were you able to find untreated 4×4, did you need to go direct to a lumber yard?
Thanks
Hi, could we leave the base the same dimensions if using your plans to build a 70 or 72 inch round table top? If not, how many additional inches would you add to each piece on the base?
Hi there! Could I put a 42-48 inch top on this? And if so, how do I go about that?
Hi Jessica, my top here is 48″ diameter. Check the photos and you’ll see the top pictured from the underside with dimensions of the 2×4 center cross pieces. Start with that and then cut the 2×6 pieces with 45 degree miters to fit in between.
Hi there! So does this mean the cut list is exactly what’s needed to only make the stand and not the top of the table?
Yes the cut list is for the base only. The top of the table is separate, I don’t have a cut list for that but the dimensions are noted on the pics. Good luck!
Hi Jamie. Great work.
What wood did you use?
Basic lumber from Home Depot, pine and fir.
Thanks Jamie.
Another question if I may. Did you apply a top coat? If so, which finish did you choose, satin or semi-gloss. Looks like satin.
Thanks again.
Yes for the top coat I used clear wax.
How tall is this? I’m looking for counter or pub height.
This table is regular dining table height about 30″. You could adjust but I’m not sure about the stability once you get taller, maybe the base would need to be a bit wider as well. Good luck!
Chtis,
Did you ever find something that worked for your counter table, i am trying something similar.
Thanks
How do you know what angles to cut for the table tops? Are they all just standard?
Hi Miranda, The angles are marked in the cut list on Ana’s plans linked above. I believe for the top they are all 45 and for the base 30 but follow her steps.