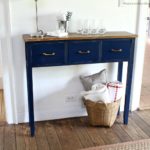
The sliding barn door, it’s become a favorite of many and a trend that seems to be sticking around for awhile. I built this sliding barn door console and also made the hardware too because when you DIY you can make it exactly how you want.

Today I’m sharing how to make your own sliding barn door console hardware using off the shelf supplies from the hardware store. Also known as DIY hardware for your sliding barn doors.
This DIY sliding barn door console was my knock off project submission for week one of Creating with the Stars last Spring and it took first place! I’m finally getting around to sharing how I built the console including the hardware you can build it too AND for a fraction of the retail cost.
This post contains detailed information on the sliding barn door console HARDWARE with links to free plans you can download and print.

My build was inspired by Sundance Catalog’s Yorkville Sliding Door Console (no longer available).

The retail version above sells for $2800 plus shipping – yikes! I’ll show you how to make your own DIY version for $300.

The barn door hardware is actually a collection of basic hardware pieces you can find at any big home improvement store – aluminum bars with 1 1/2″ pulley wheels.

Ana White recently shared my interior cedar shutter plans over at her place and this console is in those pictures which got a lot of readers interested so I thought it was time to post the plans.

Below are details on the hardware used to create the sliding barn door console doors:
Supplies:
- 1 – 1″ L shape angle aluminum bar x 1/8″ thick x 96″l (base track)
- 1 – 1″ flat aluminum bar x 1/4″ thick x 96″l (hanging track bar & vertical door bars)
- 4 – 1 1/2″ awning pulleys
- 3 – #12 x 2 1/2″ metal screws
- 3 – 1″ steel spacers
- 24 – 1/4″ washers
- 7 – 1/4″ hex nuts
- 4 – #12 x 1 1/2″ metal screws
- 8 – #12 x 3/4″ metal screws
Cut list:
- 1 – L shape aluminum bar @ 60″l (base track)
- 1 – flat aluminum bar @ 62″l (hanging track bar)
- 4 – flat aluminum bar @ 8 1/2″l (vertical door bars)


Step 1: Cut the bar pieces as listed above. I highly suggest an angle grinder if you have one. Be sure to smooth any sharp edges using steel wool.
To make the cuts I used a combination of a coping saw, dremel drill, metal rasp and steel wool. Definitely consider using a Dremel saw-max or an angle grinder, it will be much easier but I didn’t have those tools at the time so I made it work using what I had on hand.


Step 2: You need to remove the pulley wheel from inside the pulley mechanism. This will not be fun. I used my dremel to slice off the center ‘button’ on both sides of pulley then clamped it down and hammered away at the center pin using an old drill bit:

Tip: the pin will come out faster if the metal is cold (put the pulley in the freezer).

Step 3: Spray paint all the metal pieces (I choose not to paint the screws & washers) using oil rubbed bronze.

Step 4: Attach the base track first. Center the track and set the door in the track to be sure you have enough sliding space. Predrill and use 2″ wood screws down into base moulding.

Step 5: Attach the hanging track 1.75″ from top. Mark the face frame and predrill holes all the way through the frame.

Set up the hanging track hardware in the order pictured above.

Step 6: Secure the hanging track to the face frame with the hardware in the following order: screw, washer, track, spacer, nut.

Step 7: Create the door hardware. Again layout the hardware in the order pictured above: screw, washer, flat bar, washer, pulley wheel, washer nut. Predrill the flat bar in 3 spots (2 holes to attach to door, one hole above for wheel mechanism).
Place door in base track then lift 1/4″ or add a spacer, you need bottom clearance for the door to glide. Now place wheel (attached to flat bar) in track and see where everything lines up. Use dimensions below as a guide:

Step 8: Predrill holes in door front for remaining 2 washers and 3/4″ screws then attach. Repeat process for other side, be sure door is level.
Step 9: Hang doors onto track. The hex nut will allow you to adjust the tightness of the rolling wheel and enables you get past the middle screw head on the hanging track.

SHOP THIS PROJECT:

I SO love this piece!!
Awesome piece! Thank you.
Anat
This is one of my very favorite projects of yours. (And that's saying something because I loe everything you create.)
Pinning away!
I really love your post. Must say that you are very innovative.
For me making sliding doors was something next to impossible, but yes you made it easier with your post.
Awesome! Finally found a piece I want to build – been searching for months. What are the overal dimensions of the finished piece?
63"w x 20"d x 30"h
Hi! great tutorial! I am getting ready to build a barn door media console and was wondering what did you use to cut the aluminum bars for the doors? I'm just wondering if I need to buy a special tool/blade:) thanks!
So I was going through your plans as I do before everyone one of the furniture builds and your step by step for constructing the hardware is amazing. I thank you for that. Unfortunately your step by step for constructing the actual console isn't all there. It seems some steps were skipped while other steps just didn't add up. I did the math on most of your measurements provided and the cuts are usually off by 1/8 of an inch. No big deal as that's easily adjusted but there were too many steps skipped for me to take on this console.
What I'm going to end up doing is building another console from someone else's plan and applying your hardware instructions for the doors which is a blessing and I thank you for that. Unless you can provide some better measurements or instructions. All together thank you though.
I came to your page about a hundred times to follow your directions! Thank you!!! Here is my marble-topped sideboard:
https://flic.kr/p/EUd9tq
and
https://flic.kr/p/EWvHxK
Quick question to anyone. I'm new at wood working and created this console from the plans above. Everything went well except for the sliding doors. When I glued the doors they looked perfect, I left for work for 2 days and came back, and they were both bowed the same direction. I had cut 6 pieces of 1×6 and glued them on to 1/4 inch Ply for the sliding door….what happened?
Thanks for any help
Luke, I did a lot of internet research on this furniture plan before I built it, and I saw a hobby furniture builder who builds these to sell, and she puts a metal bracket on the side of the doors to prevent the bowing. I know my answer doesn't help much, but I want to let you know that someone else had the same problem.
@Luke it also depends on how you lay them up. With wood you want to alternate the grain curves, and then I'd probably glue + pocket hole them together and clamp. I'd let it dry and cure indoors, as well.
What Courtney said would help, too. You can buy some thin metal (1/8" and screw into the doors from the backside. It should give you enough clearance from the frame but would double check. Can put a few holes thru them, paint and screw in. They wont ever be visible but would give some strength to them (I'd put two, about 3" from top and bottom running perpendicular to the joint)
I havent built this but am doing research
For what its worth, mcmaster has some pretty cheap metal you can buy.. Thats where I'm ordering all my bar stock from.
Two questions:
Lovely cabinet. Can't wait to build mine.
1. What is the "stop" that keeps the door from sliding right off the track?
2. I'm making a custom width cabinet (66"). How do I size my track, considering the frame width for each cabinet opening, door width, etc? I would deduce it from your plans, but I didn't see anyplace where your track length was mentioned.
Thanks.
Lon
Never mind, Jamie. Finally found all the info I needed in your very thorough description.
How do the doors stop from going off the top rail?
John I don't have a stopper on my doors but I have seen versions where people add a piece at the end of the bar.
Thanks Jaime. What would I use for a stopper on 1/4 inch thick aluminum from Home Depot or Lowe's?
Just bend the end of the aluminum back maybe 3/4" to make an L at both ends, that's probably the easiest solution.
Bend the aluminum may be hard. You could do whatever you want. Glue another piece of metal that protrudes more htan your wheel, drill a hole and affix a bolt w/ nut and a sleeve to keep from going thru, or if you have atap set, drill a hole and tap it, and screw the bolt right in 🙂 As long as the bolt is painted to match your rail should look fine. Mine dont have any stops, and in fact during a showing (selling my house) an agent pulled the door off on accident lol.
Thanks for the info. My 3 year old woukd be rolling them off all day.
Question, do these doors make alot of noise when opened and closed?
No not at all. The only think I would recommend is getting small circular felt pads and maybe sticking them to the back bottom corners of the door to prevent the door from sticking a little to the unit. Other than that perfect.
Just wondering on the “metal screws” you list in the material list, are they metal self tapping screws or machine screws?
Hi Tracy, The metal screws are machine screws. You can see them in the photo ‘hanging track hardware’ and depending on your set up 2 1/2″ may be too long.
Love this! Wondering about stoppers on either end so the doors don’t slide off? Thanks!
Thanks Jenny, you could bend the hanging track at the ends to prevent the doors from sliding off. Or install an additional spacer to act as a stop.
Remove the pulley wheels in 20 seconds [I bought 2 inch wheels which probably make it slightly easier. Put the pulled bottom side down in a vise. Use a bi-metal blade in a reciprocating saw [‘sawmill’] and place the blade on the pin between the pulley and side of the pulley. Make sure its clamped tightly since only the bottom is clamped. Should take 10 seconds of cutting to get through the pin…you may not even have to cut the other side, it often can just be removed. Use the precautions you would with any power tool.
This is a great plan, do you have anything like this but smaller in dimensions?
Hi Jamie, I don’t have a smaller version but Ana White just posted this size: http://www.ana-white.com/2018/10/free_plans/snack-cabinet-mini-fridge-and-microwave
The hardware worked much better when I used a 1” screw, washer, flat bar, 3 washers, roller steel bar bearing wheel 1-¼”, cap nut. The 3 washers are to push the bar out further from the track so that the doors can slide past the screw on the center of the rail. The bearing wheel rolls much smoother and doesn’t wobble on the track since you can really tighten the nut on it. Also saves you from disassembling the pulleys and was cheaper. Found them in the section with screen door parts.
https://www.menards.com/main/doors-windows-millwork/door-window-hardware/patio-door-hardware/prime-line-reg-5-16-x-1-1-4-steel-ball-bearing-concave-rollers-with-bolts-2-pack/d1502/p-1444451472908-c-19312.htm?tid=9042321222144914657&ipos=15
Thank you Allison, so nice of you to share your finds. I truly appreciate when readers share their edits so everyone can benefit. Enjoy the holidays!
Can you snap a picture of your suggestion? Are you putting the head of the screw in the back and the cap nut in front so that it is the piece that you are looking at?
Hi Julie, Not sure which part you are referring to but the head of the screws are in front (visible) and the nut is behind the last washer where the wheels are attached.
Hi, I was wondering if someone can give me some insight to an issue I’m having.
We finished building the table, put the hardware on, hung the door and the door is pulling out a lot from the bottom of the door. We’ve tried different sized wheels with no change and everything is level but can’t figure out why the door is pulling out from the bottom (sticking out)? Thank you, Lindsey
Hi Lindsey, You need the bottom L track. Look in the post, there’s multiple pics of the doors and you’ll see the lower track. This keeps the doors from swinging out. Hope that helps.
Yes thank you. I have looked over everything throughly, I’d prefer to have no bottom track. I’ve seen plenty of them without it but just can’t figure out how to prevent it from pulling out at the bottom otherwise!?