• Home
  • Blog
  • About
  • Contact
    • Disclosure
    • Privacy Policy
  • SHOP
  • Widget area for main menu

    • Email
    • Facebook
    • Instagram
    • Pinterest
    • Twitter
    • YouTube
  • Skip to primary navigation
  • Skip to main content
  • Skip to primary sidebar

Jaime Costiglio

build - paint - sew

  • BUILD
    • BEDS
    • BENCHES
    • DESKS
    • DRESSERS
    • GAMES & TOYS
    • SCRAP WOOD
    • SHELVES
    • STORAGE
    • TABLES
  • TOOLS
  • PAINT
    • CRAFTS
    • FURNITURE
    • HOME DECOR
  • SEW
    • GIFTS
    • HOME DECOR
    • POUCHES
  • HANDBUILT HOLIDAY
    • 2021
    • 2019
    • 2018
    • 2017
    • 2016
    • 2015
    • 2014
    • 2013
  • GIFTS
    • BABIES
    • KIDS
    • FOR HER
    • FOR HIM
    • TEACHERS
    • WEDDINGS
  • SEASONAL
    • 4TH OF JULY
    • FALL
    • HALLOWEEN
    • CHRISTMAS
    • SUMMER
    • SPRING
    • ST. PATRICK’S DAY
    • THANKSGIVING
    • VALENTINE’S DAY
    • WINTER
  • SALTBOX PROJECT
    • BATHROOMS
    • DINING ROOM
    • EXTERIOR
    • FAMILY ROOM
    • FOYER / MUDROOM
    • KIDS BEDROOMS
    • KITCHEN
    • LIVING ROOM
    • MASTER BEDROOM
    • PLAYROOM
  • SCROLL SAW

DIY Handpainted Planked Wood Sign

July 28, 2014

How to make a diy handpainted planked wood sign with any quote or words you love.

diy handpainted planked wood sign

Take a wood background and handpaint letters, words or your favorite quote all without a fancy vinyl cutting machine.

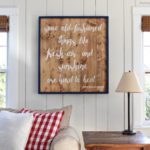
I made this wood planked sign for my in-laws beach house using a famous Ralph Waldo Emerson quote.  I’ll show you how you can create your own handpainted planked wood sign using your favorite quote down below.
diy handpainted planked wood sign
This is a great scrap wood project that benefits from all the imperfections like dents, knicks, chips, rough bits, knots – as long as the boards are somewhat flat then I say go ahead and use them!
diy handpainted planked wood sign
How to make a handpainted planked wood sign:
Supplies:
  • 3/4″ thick scrap boards
  • 1/4″ plywood (big enough for sign backing)
  • miter saw
  • wood glue
  • nail gun & finish nails
  • paint
  • sander
  • computer print out of lettering
  • ballpoint pen
  • 7/8″w x 1/4″ thick flat lattice
diy handpainted planked wood sign
Step 1: Cut 3/4″ thick boards all the same length, nail and glue to 1/4″ plywood backing or use two pieces of narrow boards perpendicular to your sign boards on the back and attach.
diy handpainted planked wood sign
Step 2: Paint wood planks.  I used a soft blue green.  If you’re looking for something with more depth check out my friend Bethany at Reality Daydream post here on creating a rustic finish.
diy handpainted planked wood sign
Step 3: Sand planks to distress.
diy handpainted planked wood sign
Step 4: Print out lettering to fit and layout on board.  Play around with various fonts.  There are lots of free font sites out there plus the vast font styles already available in Word.  It’s good to change up size and style to keep the viewer interested and engaged.
diy handpainted planked wood sign
Step 5: Trace lettering using heavy pressure with ballpoint pen.
diy handpainted planked wood sign
Step 6: The pen creates an indent in the wood.
diy handpainted planked wood sign
Step 7: Paint on and inside the indent.
diy handpainted planked wood sign
For added dimension paint a dark blue shadow down and to the right of each letter.  Once dry apply stain to enhance the distressed wood then seal with clear spray poly.
To make a frame cut 1/4″ thick flat lattice pieces to fit and stain then glue and nail into sides of planks.
SHOP THIS PROJECT:
For more handpainted sign ideas:
diy arrow shaped signs
handpainted sandy feet sign
handpainted halloween sign
diy marquee sign with lights

You may also like...

  • DIY Cedar Name PlaqueDIY Cedar Name Plaque
  • DIY Wood Planked SignDIY Wood Planked Sign
  • DIY Handpainted SignDIY Handpainted Sign
  • “B” is for Beach“B” is for Beach
Share this post:

Filed Under: DIY, HOME DECOR, HOME DECOR, PAINT, SCRAP WOOD9 Comments

Reader Interactions

Comments

  1. Our Pinteresting Family says

    July 28, 2014 at 1:10 PM

    Beautiful! You are seriously so good with a paint brush when painting letters especially. I am going to have to give this a try soon.

    Reply
  2. Pauline Henderson says

    July 29, 2014 at 1:31 AM

    Love your work 🙂

    Reply
  3. Vcs31299 says

    April 19, 2015 at 5:04 PM

    Love this. What fonts were u using?

    Reply
    • YVONNE NELSON says

      May 5, 2018 at 10:46 PM

      The Words; (sunshine
      wild air)
      What font and size do you use

      Reply
      • Jaime says

        May 6, 2018 at 8:09 AM

        Hi Yvonne, my apologies I don’t remember the exact font as I made this a few years ago. It’s very similar to Lost and Wild https://www.dafont.com/lost-in-wild.font?text=sunshine

        Reply
  4. tidirob says

    April 9, 2017 at 7:44 PM

    Love this sign….I use transfer paper and paint pens

    Reply
  5. Unknown says

    June 3, 2017 at 6:45 AM

    Hi, I love this sign! cannot wait to try it 🙂

    Reply
  6. Stephanie, One Caring Mom says

    July 5, 2018 at 10:11 AM

    I LOVE these kinds of signs but I never thought that I’d be able to make one. You make it look so easy!!! And I absolutely adore the saying on this one!

    Reply
  7. Elaine Russell c says

    December 22, 2018 at 7:39 PM

    There is a product called transfer paper. It comes in black, gRey, or white. As a decorative artist for many years, I thought you might be interested in trying it. You place it between your saying and the wood, trace the letters as above and it leaves an outline of each letter. It might be better than etching the wood. Easier on the hands too. Just an idea.
    Love the saying., and thanks for sharing.

    E. M. Russell CDA

    Reply

Leave a Reply Cancel reply

Your email address will not be published. Required fields are marked *

Primary Sidebar

Hi! I’m Jaime

Jaime Costiglio

Hello!

Thank you for stopping by.
Join me for lots of DIY.

Read more

Get new posts via email

Handbuilt Holiday: Gift Project Plans

handbuilt holiday gift project plans

Collection of DIY gift project plans to build.

The Home Depot Tool Prospective

THD Prospective

Tools to consider for the DIYer.

Archives

The Home Depot Logo
Copyright © 2023 Jaime Costiglio · Custom site by Moonsteam Design

Privacy Policy