Giving back feels awesome and I’m always happy to build for others in need. This coffee table was built specifically for a Habitat for Humanity home in Connecticut and I love knowing another family will get great use out of this awesome piece of furniture.

Build a large simple coffee table using off the shelf lumber and my free plans here. Basic construction techniques and easy to follow steps.
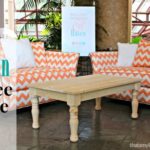
A beautiful coffee table to share with you today including the free plans to build your own. I say beautiful but in all honesty it’s rock solid and super sturdy and made so you can put all the books, drinks, snacks and feet up without feeling guilty.

I’m working with a team of bloggers on a Habitat for Humanity project where we are furnishing an entire home in Connecticut for a nice little family. This coffee table will go in their living room along with a few other pieces I’ve been working on.

We spent a day working on the house back in March but the real transformation will happen when all the furniture, decor and accessories get put in place in a few short weeks. For now I’m sharing the coffee table from my backyard because I’m not certain I will be able to get good pictures on delivery day.

This coffee table is solid and I mean super solid kids can jump on it (probably not recommended but I know kids climb all over anything).

I opted for a painted finish for two reasons 1) paint hides a lot of flaws in the wood, especially because I used studs and 2) I know the sofa is brown so I’m hoping this lighter paint will offset the heaviness of the sofa.


There’s tons of surface area at 48″l x 33″w and the additional shelf below provides plenty of storage for baskets of toys and blankets.

I don’t care what anyone says, studs are beautiful.


Want to build your own coffee table? Of course you do! Be sure to read through all the steps prior to beginning and always follow all safety precautions when operating power tools.


Just a tip – I opted to keep the base pocket holes facing upwards as they will be covered by the base slats. Anytime you can completely hide the pocket holes is a win in my book.


When attaching the top to the base I suggest clamping it in place for a tight, snug fit.


Even unfinished this coffee table is steller. If you do build this version please be sure to share on social media and tag me, I want to see your creativity!
Follow me on social media for more project ideas and sneak peeks:

Another awesome furniture build, Jaime! Thanks for sharing these great plans! The table is BEAUTIFUL!
How exactly did you attach the bottom slats? Did you use a nail gun?
They used wood glue.
I used wood glue and a nail gun. Alternatively you could screw the slats down countersinking the screw head.
Great post! I was wondering if you had any posts about how you painted/distressed this piece. What type of paint did you use? How many layers? ect. Thank you so much!
Mara I believe I used a combination of a few left over off white paints I had on hand, two coats. Then sand to distress the edges and stained probably Minwax early american. I do know I sealed the whole piece with clear satin poly three coats. Hope that helps.
Beautiful table! Could you tell me approx. How much the cost is of this build. Im planning on making my boyfriend this table!(:
Thanks Chelsea, the cost of lumber varies greatly depending on where you live and purchase. I’d estimate I spent about $125 on lumber for this table. Good luck!
Jaime, your plans were so detailed and easy to understand – thank you! I modified the size to 54”x44” and made the base shorter to accommodate an upholstered top. I painted the base black with Black Limousine cabinet paint by Behr, added small spaces between my lower slats because I don’t have a table saw to rip any down (and with my different dimensions, that would have been necessary if I wanted to have the slats snug against each other), and upholstered the top in vegan leather. My upholstered corners aren’t perfect, but we couldn’t be happier with the ottoman itself! It really makes our two couches more usable and at a fraction of the cost of a store-bought ottoman…and it is exactly the size we wanted. Thank you for providing directions that are so easy to use! I am not very experienced, but really enjoy doing projects like this!