Snowstorm Jonas kept me hunkered down all weekend with plenty of time to make proper plans for the sliding barn door console.

Build a sliding barn door console using my step by step free plans. This is a knock off of the Yorkville Sliding Door Console from Sundance Catalog.
Thank you to everyone who has shown so much interest in the original console post where I shared cut lists and the basic construction process. It’s because of your interest and questions which spurred me on to make proper plans down below.
Awhile back you may recall I built this console for week one of the Creating With the Stars series in the Spring of 2014.

Week one of the contest was a knock off theme and I was inspired by Sundance Catalog’s Yorkville Sliding Door Console (no longer available).
The retail version above used to sell for $2800 plus shipping! But I’m sharing the plans down below to make your own DIY version for about $300.
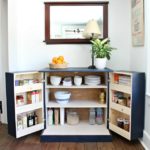
This sliding barn door console has it all:
- open access shelf style storage
- two sliding doors for hidden storage
- large open serving space

The barn door hardware is fairly simple pieces you can find at any big home improvement store – aluminum bars with 1 1/2″ pulley wheels. For more details on the hardware portion see my original post here.
Below you will find the step by step instructions and a few process photos to build this console. Please follow all safety precautions when using power tools.

Click here for a printable PDF version of the sliding barn door console plans.
For the barn door hardware details visit my original post here.

To build this console I used my Kreg rip cut.

Start with building the carcass first and double check your measurements.

Next install the shelves as you desire or you can make the shelves adjustable using the shelf pin jig.


Lastly attach the door hardware tracks as indicated. For more information on hardware details see my original post here.

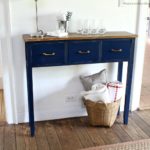
Finish as desired. I choose to paint the face frame in white high gloss enamel and stain the remaining parts.

Thank you for visiting. I appreciate all the comments and if you have any questions please leave them down below.
SHOP THIS PROJECT:

wow Jaime! That console is beautiful, but the addition of the doors sends it over the top. I've been wanting to do some sliding windows and have wondered how to do it. I'm not sure I could pull this off, but it may go on my to do list!
thanks for once again inspiring me to "copy" you!
gail
Wow!
This is exactly what I wanted to build. I just didn't know how to build it. I'm a graphic designer, not a carpenter.
I'm just an ordinary guy who likes to save money and build things that are way out of my budget. Most of the time I can visualize an idea in my head and later put in on paper.
You've just saved me a great deal of time and energy to create this masterpiece.
Thanks for inspiration! Thanks for the detailed plans!
Mr. Green
Great project and plans. Just a note, to complete the console properly, the shelf dimension must be 17 1/2 inches, not 18 1/4. This will allow room for the shelf trim inside the face frame. The drawing also shows a front top overhang of 4 inches which is not correct. Check the dimensions before cutting.
Thank you! I was scratching my head bald looking at the shelf measurements that didn’t make sense to me.
Thank you Howard Hale for pointing that out. we figured this out before reading this comment unfortunately. guess it's time to cut the shelves down!
This should be corrected in the directions and diagram, for sure!
In step 5, when attacing the top to the carcass, are you screwing/countersinking from the top down into the carcass (top to bottom), or from the carcass up into the top (bottom to top)? I ask this because from top to bottom the screws may be visible, but from the carcass up into the top the screws wouldn’t be visible.
Thanks!
Thanks Tate for catching that, yes you attach the top to the carcass by screwing from inside the carcass up into the top (thus hiding the screw heads).
What dimension of plywood do I buy? It just says 3/4″ 2 sheets. What size sheets so the cuts work out? Also what size 1/4″ sheet? Thanks!
3/4″ thick plywood sheet is 4′ x 8′. Same for the 1/4″. It’s always a full sheet (4′ x 8′) unless indicated. Hope that helps.
I made this console with a few adjustments..I used your plans.very happy the way it came out..I used all oak no plywood except back
Love hearing this Randell, thanks for adding your notes. It’s so helpful to others considering this project to read through for tips.
Two (2) quick questions from the comments:
Howard Hale says
June 27, 2016 at 9:37 AM
Great project and plans. Just a note, to complete the console properly, the shelf dimension must be 17 1/2 inches, not 18 1/4. This will allow room for the shelf trim inside the face frame. The drawing also shows a front top overhang of 4 inches which is not correct. Check the dimensions before cutting.
1.) Is it the cut plan dimension or the actual drawing dimension that was incorrectly stated at 18-1/4′ and should have been
17-1/2 ?? I see a dim for 18-1/4 on page (2) on the Cut List and a dimension for 18-1/4 in Step 1 on the carcass; then again on Step 3 on carcass.
2.) What is the issue with the 4″ overhang Hale commented on?
Thanks you for the FANTASTIC project,
James
Thanks James, yes Hale is correct in that 1) shelves should be 17 1/2″ in order to allow for the front shelf trim to sit flush with the carcass and 2) on the PDF plans in Step 5 I incorrectly noted on the sketch a 4″ overhang at the front and also wrote it incorrectly in the Step 5 instructions. Apologize for the typo and I believe the front overhang should be 1 1/2″ which allows for the front trim (3/4″) and then ultimately a 3/4″ overhang. Hope that helps.
Hello what are the exact tools used? Will a miter saw work? i have a 12 inch. What pocket hole jig was used?
Hi Jamie!
Awesome cabinet and I’m really looking forward to building one:). I was just wondering what type of plywood you used? Did you use hardwood or use a sanded fir/ pine?
Thanks so much
Zack
Hi Zach, I used sanded birch plywood.
Hi- I am really looking forward to making this!! I am a newbie so a question for anyone that has input-
What size of top can I put on this keeping the rest of the dimensions the same? I want to use it for a craft room and would like a larger surface than 20″. I am going to go with a maple plywood top so I can get it cut to whatever size- any input would be appreciated!
Thanks again for the plans!
Hi Ciona, if your top is 3/4″ thick I wouldn’t extend any further than 8″ on all sides without adding addition supports (corbels etc – which would affect the door functioning a bit). If you double up the top at 1.5″ thick you could extend further – more like 12″ on all sides – before you need additional supports. Good luck!
So I have a question. I didn’t realize til I started putting it together that I grabbed 1/2” plywood sheets wood not 3/4”. Will this still work do you think? Maybe not hold as much weight? I seriously must have been half asleep when I picked it up.
Hi Marcy, I wouldn’t build this unit using 1/2″ plywood – too flimsy.