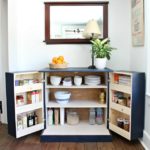
Vintage furniture lovers this post is for you because today I’m sharing plans to make this replica vintage shelving unit. It’s a rare day when I jump in a photo but truly this was one of the most fun builds and I just had to get in there for scale (and so you know I’m actually here, usually hiding behind the scenes covered in sawdust).

A DIY tutorial to build replica vintage shelving used for display. Free plans to build open shelving with adjustable shelves.
You may recognize this shelving unit from Miss Mustard Seed’s post over on Instagram a few years back. Through the magic of social media I reached out to Marian and she was kind enough to send me a few estimated dimensions and photos from other angles so I could recreate this piece and make building plans for you.

Marian commented how she had sold this piece and regretted doing that and I immediately thought well let’s build a replica to replace it. Now nothing will ever come close to real, true antique furniture, it’s nearly impossible to recreate years of wear, knicks and worn wood in all the right places (not to mention those casters on the original piece hubba hubba!!) but we can make a replica.

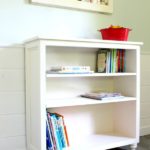
My replica is similar in size, shape and design and if I had one ounce of Marian’s finishing skills my paint job might be better. Alas I should have used milk paint or chalk paint but I tend to use what I have on hand so it’s regular latex paint with the vaseline trick.


That’s the beauty of making replica furniture, you can finish it how you like. And my point here is to share the free plans (down below) so you can build this piece for your own home at a fraction of the cost of buying an antique.

The shelves in this unit are movable so you can adjust the space to fit your needs, adding more or less as you like. And it’s not too deep or bulky so this piece won’t stick out far into your room.


I love the little angled cross stretcher detail, that was probably essential support in the original version but for my build it’s simply decorative.

Below are step by step instructions to build a replica vintage shelving unit. Always read through all the steps before beginning and follow all safety precautions when using power tools.

Supplies:
- 4 – 2x2x6 boards
- 1 – 2x2x8 board
- 3 – 1x2x8 boards
- 2 – 1x10x8 boards
- 1 – 1” dowel @ 48”l
- 2 – 3/4″ square dowels @ 36″l
- 1- ¼” plywood handy panel
- 1 ¼” & 2 ½” pocket hole screws
- 2”, 1 ¼” & ¾” finish nails
- wood glue
- 4 – 2” casters (2 locking)
Cut List:
- 4 – 2×2 @ 60” (posts)
- 14 – 1×2 @ 9 ¾” (shelf supports)
- 2 – 2×2 @ 48” (base front and
back) - 1 – 1” dowel @ 44” (cross support)
- 2 – 1×2 @ 43” (back supports)
- 4 – ¾” square dowel @ 9 1/4”, both ends
mitered 45 degrees (angled supports) - 1 – ¼” plywood @ 12 ¾” x 28” (base
shelf) - 4 – 1×10 @ 48” (shelves)

Step 1: Prepare posts. Round off top corners using a jigsaw. Make 1” diameter hole in only 2 posts using a spade bit, go about ½” deep. Predrill pocket holes at back for later attaching to base.

Trace a small paint bottle to mark the curved edge then cut with a jigsaw, flip it over and repeat process on other side. Sand smooth.

Step 2: Attach shelf supports to post using wood glue and 1 ¼” pocket hole screws. Consider making an 8 ¼” spacer from scrap wood. Make 2 of these.


Step 3: Attach other post to shelf supports using wood glue and 1 ¼” pocket hole screws.


Step 4: Make base by attaching cross supports to front and back pieces using wood glue and 1 ¼” pocket hole screws.

Step 5: Attach sides to base using wood glue and 2 ½” pocket hole screws.

Step 6: Insert top dowel into predrilled hole, use wood glue and secure from exterior using 2” finish nails.

Step 7: Attach back supports using wood glue and 1 ¼” pocket hole screws.

Step 8: Attach angled cross supports using wood glue and 1 ¼” finish nails.

Step 9: Attach base shelf using wood glue and ¾” finish nails.
Sand well and finish as desired. Add casters and insert shelves.

Hope you enjoy these plans and be sure to share on social media and tag me, I love to see your finished projects! Happy building.
SHOP THIS POST:


I absolutely love this!! Thank you for the plans!
That is lovely! I have been tempted a time or two to replicate Miss Mustard Seed's antique finds…Simply gorgeous!
Amazing replica of Marion's vintage shelf! Well done!
p.s. You look pretty cute standing next to your creation. :o)
Love it! And love to see you close to your creation. Well done!
Love this! Can't wait to build it. Have the perfect spot in my kitchen for it. Thanks so much for sharing the plans.
great build Jaime!
I love how "vintage" the shelving looks!
pinned
gail
I've already forwarded these plans to the handyperson in my family… He even says that they seem like they'd be the same price or cheaper than anything from Ikea, so I'm totally sold! – Jerusha, TheDisneyChef.com
HOLY WOW!!! This is such a great piece, and thank you SO much for sharing your awesomeness!!! Miss Marion is my hero, and YOU are my building hero…this is definitely going to be my first build with my new Kreg! it is the perfect size, and will become much needed storage in my tiny little kitchen. Seriously, it is like you read my mind!!
Oh I loove this!
Thank you so much for sharing!
Have a Happy Easter! 😉
The adorableness of this shelf can not be contained. Love, pinned!
Love it! Now to see if my husband is on board. Do you have a rough estimate of cost for the wood you used?
What a beautiful build Jamie! I love the vintage feel and it's so functional too!
I've already printed off the plans! hopefully i can find a spot to put it once I build it. Looks very easy.
just one question, in your cut list you mention cutting 4 – 3/4" square dowel @ 9 1/4, it isn't mentioned in your supplies list. and what exactly is a square dowel and it's dimensions so that I can find it in the big box store? Thanks so much!
Deb
@Djaho Deb thank you! Yes I forgot the 3/4" square dowel in the supplies list, I have made the edit. You will need 2 – 3/4" square dowels (they are sold in 36" lengths and usually are near the circular dowels). A 3/4" square dowel is 3/4" x 3/4" square x 36" long.
Thank you so much for the plans; great build! – Cheerio from Switzerland
I love this versatile project! Thanks so much for sharing the plans. I have to make one for my studio now!
Love these plans but I have a question: lots of instruction on when to use the pocket hole screws but no instruction on how and where to make the pocket holes! Did I miss something?
Hi! I know this is an old post so I’m hoping you still see it.
Did the shelves sag at all over time? I want to use it in my kitchen with various items on the shelves, including excess food storage and extra appliances (crock pot, rice steamer, kitchenaid mixer, etc). Do you feel the shelves will support such things? I see you have yours stacked with dishes but I’m guessing that was just for the photo. Thanks!
Can you please make the supply list and instructions a larger font? I’m unable to increase my screen size and can’t read them! You did a great job reproducting Marian’s original antique.