Life is pretty sweet but we just made it that much sweeter with our latest Handbuilt Holiday gift plan. Today’s project does double duty, like a transformer but even better because it’s made from wood 😉

A DIY tutorial to build a kids puppet theater that changes into a shop stand. A play market, juice bar, bakery, whatever you like, with plans from Ana White.
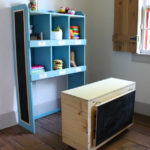
Oh friends this kids size tabletop shop stand that changes into a puppet theater with one motion is genius. Ana and I are proud to bring you another gift project plan today as we do every Friday leading up to Christmas. If you’re looking for gift ideas to build be sure to check our past 5 years worth of holiday gift project ideas here.

This is one quick project that packs quite a punch with it’s transforming capabilities leading to hours of play. I honestly cannot decide which is more fun. The puppet theater with it’s theater mask sign and stage hiding the hands and puppet storage or the juice bar up above.
Puppet Theater:

This was the first shot at building this tabletop puppet theater and I think it would be better to use a 1×3 on the ‘ledge’ to create more of a stage. Also I suggest using a 1×3 on the back cross support at the base which creates the puppet storage area, I used a 1×2 and you can see below it’s a bit low.

Regardless, the puppet theater still works great and my older kids were using it at dinner last night. I promised them I would not share the video but truly they were loving it!

Swivel Action:
Ana designed this tabletop play stand so the front panel and ledge swivel up and over to create a play market ledge. The entire piece swivels on two wood dowels (you can barely see the one up above on the side). It’s plenty deep at 5 1/2″ to be stable on it’s own without tipping over.
On the interior we used a magnet to keep the front panel in position during transport and play. The kids lift the front panel forward, up and around and it rests on those two dowel pegs you see sticking out of the sides below.

Play Market:
And now you have a play market, bakery, juice bar, shop stand – whatever kind of play stand you want it be. I added the reversible sign at top center just for fun because I’m obsessed with my scroll saw.

Fill up the juice bar with all the appropriate accessories.
Supplies:
And you’re ready for customers.


Be sure to head over to Ana’s site here for the complete free plans and steps to build this tabletop puppet theater and play stand. I have a few notes below before you go.

When attaching the front panel portion to the main body I used wood glue on the dowel that goes into the front panel and NO glue on portion that needs to swivel in the side. Cut your dowel long and once everything is in position and the glue is dry you can go back and cut flush.

To trim the excess dowel use a multi-tool with a flush cut bit. Dremel makes a great version of this and I use it all the time on various house projects.

If you’re feeling extra motivated make a reversible sign to hang at center front. I cut an oval from 1/2″ plywood and then cut the remaining pieces from 1/4″ mdf, painted and glued into position. You could also make the sign with and printed design and modge podge or a painted version would be great too.

I hope you enjoyed this fun multi-use tabletop play stand. Be sure to check back every Friday for a new gift build project idea from Ana and I. In the meanwhile follow on social media for the latest updates and more project ideas:
Instagram / Pinterest / Facebook / Youtube / Twitter
SHOP THIS PROJECT:


Thank you, this looks like lots of fun.
How did you affix the small dowel pieces in the back? The instructions and image of the front dowels are understandably clear.
Hi Rachael, For the small dowel ‘stoppers’ at the back I predrilled the hole (same diameter as dowel) about 1/2″ deep. Then cut the dowel about 1″ long to protrude just enough to act as a ‘stopper’ for the ledge. Add some glue and push the dowel into the hole. Good luck!