Give your kids a place to build their legos and make it portable with this lego tray. No parent wants lego parts all over the floor so let’s solve that problem by making a portable lego tray.

A DIY tutorial to build a portable lego tray. This simple tray with handles and lego baseplates is perfect for any lego lover.
Now your kids can make their lego builds on a portable tray AND move all the pieces for easy clean up without destroying their hard work!
Legos are one of the best toys. Even as an adult I happen to love legos but the one problem is containing the bits and pieces.

Lego Containment
And forget trying to move all those pieces and parts, it inevitably falls apart and there will be tears. That’s where the portable tray comes into play.

Portable Tray
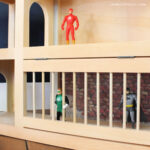
If they build the Legos on the tray they have a safe space to keep things set up. The tray sides have a low profile for easy access and it weighs just over 5 pounds with easy carrying handles.
- contained space
- portable
- handles make it easy to carry
- low profile for easy access


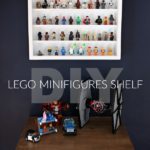
These trays measure 20″l x 15 3/4″w and utilize a combination of lego baseplates.

Portable Lego Trays

Supplies:
- lego baseplates
- 1/2″ plywood (15″ x 19″)
- 1x2x6 pine board
- pocket hole jig
- 1″ pocket hole screws
- wood glue
- 1 1/4″ finish nails
- (2) handles
- construction adhesive

Step 1: Decide on your baseplate configuration and trim the plates to fit. You can use a miter saw just go slow but a utility knife works too.

Step 2: Trim the 1/2″ plywood to fit your baseplates. Then cut (2) 1×2 sides equal to the short sides of plywood. And cut (2) 1×2 sides equal to the long side of plywood plus 1.5″.

Step 3: Assemble the tray using 1″ pocket hole screws and wood glue to attach the sides. Secure the corners with finish nails.

Step 4: Attach the handles on opposite sides.

Step 5: Apply adhesive to back of lego baseplates then press onto plywood base. Avoid getting adhesive close to edges.

Step 6: Use paint cans to weigh down the baseplates while the adhesive dries.


SHOP THIS PROJECT:

Thanks for joining me for this portable lego tray project. Please leave any questions in the comments below and be sure to follow me on social media for sneak peeks, tools and project inspiration:

LOVE!! What an awesome idea Jaime! Great way to take legos in the car or play outside. Fun.
So cool! Love this idea!
You've had some reeeeaaally good projects, but this is my favorite. So creative, inventive and smart!!
There's a reason "I hope you step on a Lego is such s curse"! You are a genius! No moew stray Legos on the floor.
One word: genius.
I have 3 kids…2 boys, 1 girl. 'Nuf said. The amount of Legos in my home should be illegal.
Very, very cool.
Gfriend that is SO stinkin cute!! Pinning and LOVING!!
This is definitely one of those, "now why didn't I think of that?" projects. Well done!
I would love to invite you to join us and link up at our Friday Block Party at Curb Alert! The link is live now and throughout the weekend. Hope to see you there!
http://tamicurbalert.blogspot.com/2012/05/friday-block-party-6-feature-from-party.html
Tami @ Curb Alert!
What a TERRIFIC idea!
Pure genius I tell ya! Such a smart idea. Love it!!
What a great idea! Right now, my son is using lego duplo, but I'd love to do this when he graduates to legos! I originally saw this on pinterest {and pinned it, of course}, then came across your tutorial on the Chic of a Shoestring link party. I link up there too.
~ Ferly
Gifts We Use {to grow, love and serve}
This is such a great idea!
BTW, I'm thinking of doing this, but increasing the tray's inside dimensions to 15 1/8" x 20 3/16". That way, I'll have room for a 48×64 stud grid, and I can use any twelve 16×16 baseplates — no trimming required!
Also: depending on the colors you want and when you look, the 16×16 baseplates on BrickLink (it's basically eBay for LEGO parts) could save you some money on supplies.
GREAT idea!!
Cute idea. This looks like something I could actually build. I am not much of a carpenter. 🙂
Amazing idea! Pinning this
Amazing idea! Pinning this
Can I please hire you to make me two?? Pretty please?
my hubby is going to love this idea and the bed idea 🙂
Very very cool. Thanks for the tutorial.
Very very cool. Thanks for the tutorial.
This may be one of the coolest ideas ever. Lve it.
We made these and the lego plate set makes two trays! My son LOVES them and we love them too. Easy cleanup!!!!
I just found your blog through interest. It is wonderful!! I am impressed with your set of skills. I can't wait to try some of the projects!!
Is it just me or does the font links no longer work? I have tried it several times and I get an error about a missing file. Does anyone know how to fix? I so want to make this for the boys for Christmas with their names.
FONT: Beverly if you're referring to the personalized lego trays here: http://thatsmyletter.blogspot.com/2012/07/l-is-for-lego-tray-4.html
The font is straight from Microsoft Word, no special link.
Thanks for this tutorial! This is awesome!
Awesome! I'm printing your instructions as I write. Thank you for such great ideas!