Frames can be pricey especially when you’re looking to frame an odd size piece of artwork or photo. Today I’m sharing a simple way to make a frame that will protect your artwork or photo and look beautiful hanging on your wall.

A DIY tutorial to make an easy frame using plywood and plexiglass. Frame any artwork or photo or almost any size using this simple method.
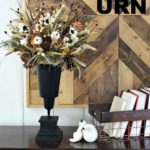
This super easy and fast diy frame project comes with an awesome custom photo art giveaway that would be the perfect gift for anyone on your list. I snuck this piece in behind our kitchen sweets Christmas tree and it fits the theme and adds a touch of warmth to the wall space:


I’ve partnered with the nice folks at Minted.com to bring you this photo art giveaway. No doubt you have lots of photos collected over the year, possibly even a few outtakes from your holiday card session? Or if you’re like me then your phone is full of candid family shots and your computer has tons of photos loaded just waiting to be printed.
Now’s your chance to make a treasured keepsake with your favorite memories! The giveaway is for one framed photo art gift worth $158. Minted’s framed photo gifts are the perfect addition to your home as well as make thoughtful holiday presents.
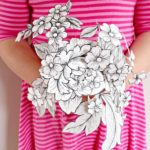
I took a family vacation picture and made it into this fun photo art:

(I sure hope Grandma & Grandpa aren’t reading this post – gift spoiler alert!)
Take your photos and turn them into display-worthy works of art. Use just one photo or make a collage with multiple photos:

My kids will love seeing these memories up on the wall.
The options are endless and all of the photo gift designs are sourced from Minted’s independent community of artists. Feels great to support those creative folks!

Maybe you want to commemorate a special event? Weddings, births, anniversaries – there’s something for everyone.
Don’t worry there’s still time to place your order, December 14th is the last day to order foil-pressed custom photo art for delivery by 12/24.

Select your photo art then start personalizing with materials, color, frame, sizes and of course your photos. The possibilities are endless and sure to be appreciated for years to come. Be sure to enter the giveaway down below for your chance to win a custom photo art photo gift!
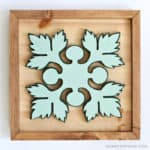
If you do choose unframed photo art you can easily make your own frame and I’ll show you how:

This artwork is from Minted’s foil-stamped wall art collection here. As soon as my custom photo art prints arrive (later today!) I will be framing them in the same method.

This frame is a piece of scrap plywood that I stained then attached plexiglass to protect the artwork. I happen to love the raw sandwich edge of plywood especially with stain.

And I choose brass wood screws I found in my stash to compliment the gold foil in the artwork. Hardware can be both decorative and functional!
Here’s how to make an easy frame using plywood and plexiglass:

Supplies:
- photo or artwork
- plexiglass (cut 1/2″ larger on all 4 sides than photo or artwork)
- plywood (cut 1″ larger on all 4 sides than photo or artwork, stain and let dry)
- 4 – 3/4″ wood screws
- drill & countersink bit

Step 1: Use a straight edge and plexiglass cutter to cut plexi to size. DO NOT remove plastic coating yet. Predrill countersink holes in four corners.

Step 2: Center artwork or photo on plywood, consider using double stick tape to keep artwork from shifting. Remove plastic from back side ONLY of plexiglass then place on top keeping it centered. Drill screws in place. *You may wish to predrill the plywood as well to be sure of no splitting.

Step 3: Remove plastic coating from front side of plexiglass. Attach sawtooth hanger at center back. Hang and enjoy!
UPDATE: THIS GIVEAWAY IS COMPLETE
Now be sure to enter the giveaway and you could win one framed photo art gift worth $158, check that off your gift list!
Disclaimer: I was provided product and/or compensation for this post however all thoughts and opinions are my own.

i love this DIY! so cool. — thanks for sharing 🙂
Very beautiful!